wowed by The Whitsundays

If you’re on instagram then you probably have worked out that I’m not sharing my usual pics from home but am far away in the Whitsundays for a couple of days. I have never left the little ones for a night except to be in hospital giving birth so it was a pretty big decision to come away for 4 days with Emerson and leave the rest of the gang with Daddy.

And can I just say that he has it all under control, booked keira’s birthday party that I kept forgetting to do, has taken them to the park, kept them entertained and given them treats and chinese takeaway tonight. It has set a great precedent for getting away when an opportunity like this comes up.

And nothing says opportunity like heading up north and having a few days with other lovely ladies (and a couple of lovely men….not too lovely of course because I’m married!) in a really beautiful part of the world. And let me tell you that from the moment we landed in Hamilton Island I felt like I was in Hawaii. Not that I’ve been but it’s just how I imagine that it would be. Everything was lush and tropical, men were in white suits and luggage was being whisked away (not mine with my big orange ‘HEAVY’  tag on it) and the tropical heat was  the first thing to hit you as you walked across the tarmac (lugging a baby, an oversized nappy bag and sunhat!). And the baggage carousel – um yeah that would be from the back of the luggage truck.

We are the guests of Tourism Queensland this week and they have been making sure that we’ve been seeing the very best that the Whitsundays has to offer. I mean this is the view from our accommodation. Amazing.

Now of course I’ll give you the full debrief when I’m home but I had to share today because it just blew my mind away. All I knew is that we had to race down to reception after our morning session, be in our swimmers and hop on a 12.30 cruise. That’s all I knew. Part of me was thinking that a dip in the pool would have been perfect but I got on the cruise and just hoped that I’d get a sandwich, a diet coke and a swim at some point.

After about an hour or so the boat we were on stopped and a smaller boat came up. Oh dear, we had to change to a smaller little boat to take us to the beach. Whitehaven beach to be exact. Now I’m not really sure how I thought we were going to get to the beach but the best was still to come. So with staff holding my hands and taking my bag and emerson in the sling I climbed into the smaller boat (while they both rocked) and off we went closer to the beach. Bye bye he says……..

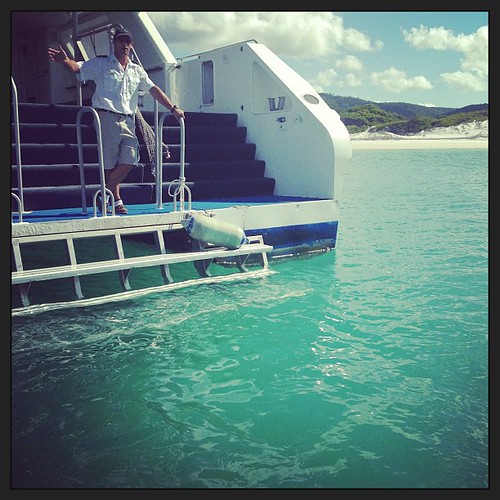
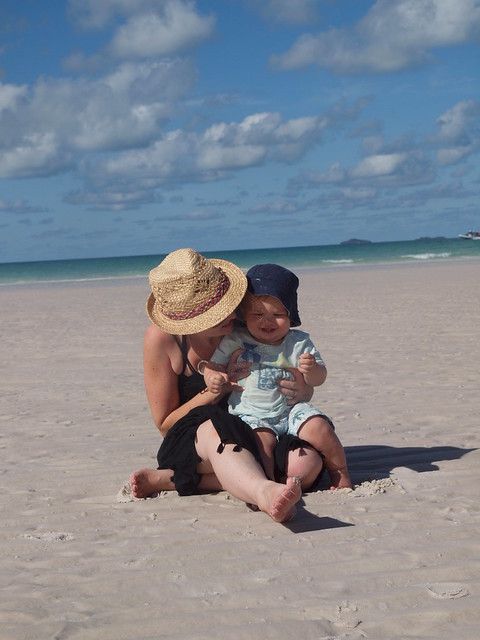
Then that boat stopped miles away from the shore (ok maybe not miles but a bit of a way out) and once I’d accepted that I had to climb out of the boat into thigh deep water with my oroton nappy bag and emerson on me – well I sucked it up, tucked my dress up into my swimmers baring my very white legs, climbed out and waded up to the beach. You can see the boat in the distance behind emerson…..

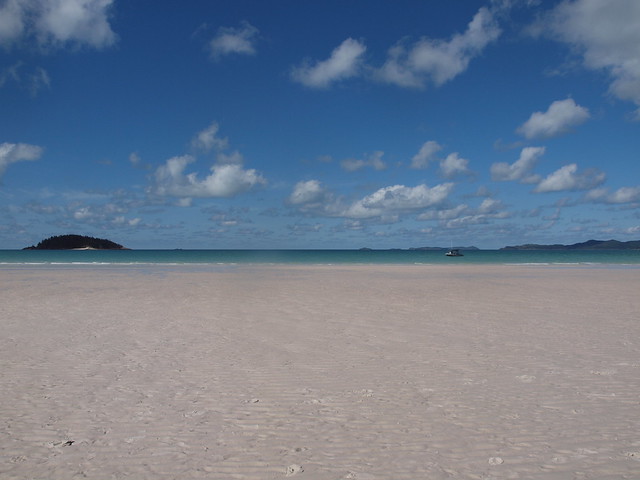
But the water was so warm, the beach so amazing and the views were to die for that actually I wondered why I’d been such a princess about the whole small boat thing. We were all pinching ourselves that we were at the most stunning beach with the most picturesque views, the whitest and finest sand I’d ever seen, crystal clear water and it was all there for us to enjoy with hardly anyone else to share it with. And we’ve been told that Whitehaven is the 3rd best beach in the world……I’d have to agree even if I haven’t been to the other two!

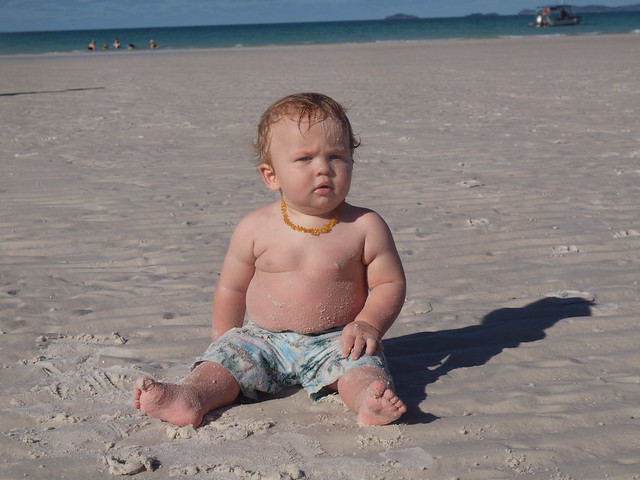
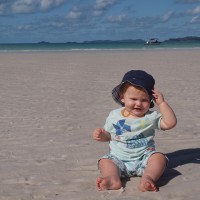
little buddha and I enjoyed a little paddle in the water, some sand eating and some rolling around enjoying the sand for a good hour. I made the sensible decision not to walk up to the lookout for photos as that would have left me a good 10 minutes to play in the water with emerson. Sometimes you have to weigh up your options, swim or bushwalk? I chose a swim and time to soak it all up and left the bushwalking to the others.

It was also just a rare treat for me to sit and be with one little person and just enjoy it all………..in peace! It’s not often that I get to dig my toes in the sand and look out at the sea. So I made the most of it with this little guy who was just having the time of his life.

But sadly before we knew it it was time to wade back out to the boat and head back to Airlie Beach. I took 50 million photos of the hills and scenery. Everywhere you look up here is picture perfect. I’m not sure how I’ve lived most of my life in Australia and never been up here before but it’s certainly taken my breath away a times with the scenery.

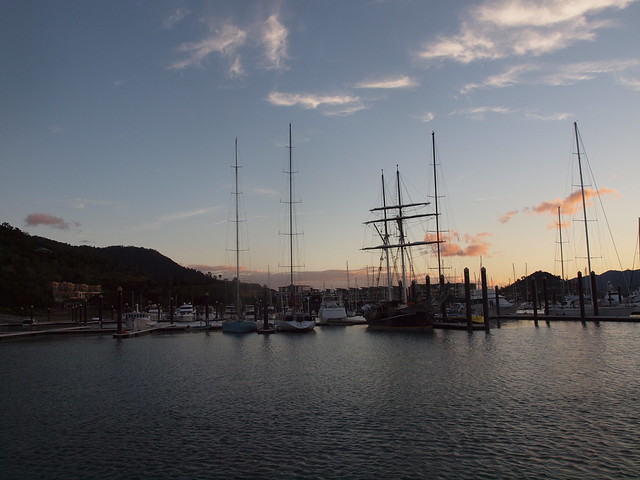
Just as were getting off the boat I realised that emerson’s good shorts had been scooped up with his nappy and were probably in the rubbish on the boat. Thankfully while they were being retrieved from a garbage bag I managed to take a picture of sunset in Airlie Beach. Another picture perfect view.

Tomorrow we have a session in the morning and then head off to Daydream island before spending the night in Hayman Island before flying home. It is rush rush rush but since I’m travelling with Australia’s happiest baby and some of the funniest ladies I know, we’re just having a ball and rolling with the tight schedule and taking pictures as we go! Stay tuned for the next instalment………………………….

Have you been to the Whitsundays? Did you love it? I’m already planning our next family holiday here since I’m so in love with the place

knitting tikki’s granny’s favourite

I love how I had this crazy idea that the school holidays would mean more craft time. I had visions of being in my sewing room or sitting outside knitting while the kids played each day but we’ve been doing swimvac every day and the days have flown by. Swimvac for the unititiated is a week where I drag all 5 to the pool and try to keep 2 or 4 of them entertained while we watch the other swim. It’s totally worth it in terms of the kids swimming but not so much for my personal enjoyment.

Oh and spot the tooth hanging on by a thread there! I have offered my services but she isn’t ready for me to give it a twist and get it out. Anyway back to knitting. Somehow this afternoon, dont ask me how, I managed to finish knitting this little cardigan in newborn size.

Well almost. It needs a little blocking (I just give it a little soak in some water and stretch into shape on a towel) and the buttons sewn on.

The pattern is so lovely. You can buy it here. I was reading one of the rows of the lace pattern incorrectly and pulled it out 3 times before I realised what I was doing. And so I decided to make the smallest size and since retro daddy forgot to tell me his PA had already left on maternity leave I decided I’d knit it for her.

The cardigan is knit from top to bottom and the armhole stitches are left on some spare wool. Once you’ve knit the body then you come back and knit the sleeves with small circulars or double pointed needles. That can sound a little daunting to a beginner knitter but once you’ve done a few seamless knits there is no turning back. I find it much more satisfying to do my knitting as one piece and see how it all comes together…..

And the wool……don’t hate me but it’s a Bendigo back room special called Shetland 8 ply. I can’t even find it on ravelry. Very soft and lovely to knit with and I like doing baby knits in cream as it just makes it so much more wholesome and sweet for a little baby. If you wanted to create a similar little baby knit then 8 ply Luxury in cream is perfect. And now I’m not starting a new project until I finish off a Kina for keira.

quick quesadillas for dinner

I spend a lot of time in this house feeding people. And by the time dinner rolls around the last thing that I want to do is go back into the kitchen and prepare a hot dinner!!!! So the quicker the dinner, the better. Now in summer one of my favourite and healthiest dinners is a quick wrap. Salad, tuna or simple ham and cheese. But now that the weather is getting cooler I’ve decided that quesadillas will replace wraps. Plus it sounds so much more exotic. Do you want a wrap or do you want a quesadillaaaaaaa?

Now it’s been a while since I’ve made them. The last time was when I made Pioneer Woman’s chicken quesadillas here. Now for the adults I’ve made a vegetarian quesadilla using one of my favourite combinations. Spinach and feta. And these which taste so much like my favourite gozleme that I just needed some lemon wedges. And for the kids? The good old ham, cheese and pineapple. Hawaiian quesadilla. You can’t go wrong with that combination when it comes to kids.

Emerson has been really sick with an ear infection so I prepared this dinner with him in a sling on me (not a good idea if you want to take a photo at the same time). Then I passed him on to retro daddy and I got stuck into frying them up. And they are so easy! A couple of packets of tortillas, some basic ingredients, a frypan and you’re all set! And retro daddy (always the accountant) was working out the cost of the dinner and it’s budget friendly too. Especially if you picked up the tortillas on special like he did.


5.0 from 2 reviews
quick quesadillas for dinner
 
Prep time
Cook time
Total time
 
Recipe type: Dinners
Serves: 6
What you'll need
  • 2 packets tortillas (I went for a medium size)
  • ham
  • cheese slices or grated cheddar
  • pineapple rings
  • small box frozen spinach
  • 200g danish feta
  • salt, pepper
  • jar of salsa (optional)
Instructions
  1. take a tortilla and lay it on a plate, top with cheese, ham and a pineapple ring. Top with another tortilla.
  2. Heat up a frypan with about a tablespoon of oil. When hot lay in the tortilla and move it around the fry pan to soak up the oil.
  3. Fry a couple of minutes on one side, when golden (not burnt!) turn it over and if you need to add a dash more oil.
  4. Turn onto a plate and cut into quarters. Serve with salsa if you like
  5. For the spinach and feta version, place spinach in a microwave safe bowl and microwave for a few minutes until defrosted.
  6. Place spinach in a clean teatowel and wring out the excess liquid.
  7. Tip out spinach into a clean bowl, add in feta and mix with a fork. Season well.
  8. Divide mixture amongst 3 tortillas and spread out towards the edges. Top with another tortilla and fry each up in a little bit of oil.
  9. They only need a couple of minutes on each side and you might have to turn down the heat if they start to burn a little. And keep adding a little oil (you could also use butter if you prefer) before you start another quesadilla.
  10. Enjoy. I know this will become a favourite in your house.


made a dress

My sewing machine has been gathering some serious dust here. You can have a lovely organised craft room (as seen here) but whether you get the time or motivation to get into the room is another thing. The last dress I made was back here. But I’ve been holding off buying too many winter clothes in the hope that I will sew and knit my way through winter.

First up I thought I’d make a pretty dress for elodie. I like to cut out a pattern or two at once and then sew them up in another sitting. Only thing is that it turned out larger than I expected because I went up a size and then added too much for the seam allowance. But the beauty of the large family is that someone will fit into it……….soon. It’s a great motto for shopping in the sales too – it will fit someone!

And actually it’s a really cute little dress for tillie to wear to preschool and out and about. This girl wants to wear dresses or skirts everyday! Forget jeans. It’s all about the dress. And as you can see by the mask it’s also about accessorising. I know someone will ask and this is Seed from about 2 Christmases ago….when Seed opened in the same shopping centre as the supermarket. Dangerous combination right there.

Now the pattern comes from a japanese craft book and it’s a nice one because it has summer and winter patterns in there. A bit quirky and full of nice patterns. I picked this up at Kinokuniya in the city but you could check out Yes Asia or etsy for a copy here!

I’m pretty sure you’re supposed to thread elastic through the neckline but I ran out of elastic on the sleeves so decided to make the bias binding casing for the neckline but thread through a tie for the neck. Now of course I wouldn’t do that for a baby or toddler (safety, of course) but it looks great and is very easy to adjust the neckline.

Fabric is from the lovely Sarah at Quilt Fabric Delights. Thank you so much Sarah, this came from the gorgeous box she sent me here. This is from London Calling by Robert Kaufman and just so light and lovely.

2 recipes and 1 dress this week…time to put my feet up! You’d be right to think that I’m behind putting clean clothes in wardrobes!


thai chickpea burgers

one of the things I’m loving about the school holidays is just spending more time at home. Two ladies were chatting behind me at swimming – about me – but in that nice way where they know I’m listening. So I turned around and started chatting. They said what’s your number one secret for being so calm with all those kids? My answer. We spend a lot of time at home.

Honestly you know yourself that you are on top of things when you have more time at home……..and when you have a few crazy days when you’re always out of the house then the washing is piled up, cleaning needs doing and you’ve run out of toilet paper, bread and milk. Honestly my million dollar idea – the drive through corner store for things you run out of so you don’t have to get everyone out of the car for a loaf of bread!

So being on holidays and not doing the school run, the activities and having more time at home means I have some extra time to prepare dinners this week. And we’re all loving the variety as I try a few new things. This was a winner….go easy on the curry paste if it’s a spicy one or you have really little ones but this was delicious. Sometimes burgers can be really dry but these were so perfect and even when I reheated them when retro daddy walked in the door they still tasted fabulous. If you like burgers make sure you check out my quinoa burgers here.

And just a little note – if you wanted to make these vegan just leave out the egg, use some oats or more breadcrumbs to get the mixture together and be sure to find a vegan curry paste that is suitable. Too easy.

thai chickpea burgers
 
Prep time
Cook time
Total time
 
Author:
Recipe type: vegetarian, dinners
Serves: 6-8
What you'll need
  • 2 cans chickpeas
  • 1-2 Tbsp thai curry paste (if you're making for vegetarian read the jar for ingredients)
  • ½ onion
  • 1 egg
  • 2 slices of bread turned into breadcrumbs (or ½ cup breadcrumbs
  • quick oats (optional)
  • flour for rolling in
  • salt, pepper, oil
Instructions
  1. Make breadcrumbs by placing 2 slices of bread in thermomix or food processor and pulsing a few times. In the thermomix just press the turbo button a few times. Set aside.
  2. Place onion, curry paste and the chickpeas (which you've rinsed and drained) and process for 10 -15 seconds on speed 4.
  3. Add in egg and breadcrumbs and process 10 seconds on speed 4. Scrape down sides.
  4. Tip into a large bowl. Your mixture will be soft but if it's runny then add in some oats or more breadcrumbs. You don't want a really stiff mixture but firm enough to fry later on. Refrigerate at least ½ hour.
  5. Tip some flour onto a plate and take a good handful of the mixture and form into a small burger shape, coating it all in the flour. Be generous with the flour
  6. Now place the burgers on a plate and refrigerate again for at least 30 minutes.
  7. Heat up a few tablespoons of oil in a frypan and once hot fry your burgers for a few minutes on each side. If they start to burn just turn down the heat.
  8. Serve with some pitta bread and salad. Retro daddy liked these with some sweet chilli sauce.


zucchini + feta slice

Once upon a time I was the queen of the frittata…………….but the frittata needed a bit of a rebrand here at retro mummy. A bit of a revamp. Because just the very word frittata was bringing out groans from everyone including retro daddy. Here was my all time favourite – sweet potato and feta frittata. So get the thermomix out, whizz everything up, call it a slice and voila everyone is eating it. Even when I say zucchini. Yes, that is a green vegetable and I have some little people who are not fans of vegetables and especially of the green variety.

This is super easy. I had been making the zucchini and bacon slice in the thermomix but we’ve been eating much less meat in the house and feta is just the best replacement ever. You only need a few ingredients for this one, can whip it up on a weeknight and  you don’t have to use a thermomix or food processor. A grater would work fine – just watch those fingers and knuckles if you’re like me with a grater. We especially like this with garlic bread.

5.0 from 3 reviews
zucchini + feta slice
 
Prep time
Cook time
Total time
 
Quick, easy and healthy. This makes a great lunch, dinner or picnic food!
Author:
Recipe type: Vegetarian
Serves: 6
What you'll need
  • ½ red onion
  • 2Tbsp oil
  • 2 large zucchinis
  • 6 eggs
  • 200g feta (we love danish feta here!)
  • 4Tbsp flour
Instructions
  1. Cut onion into quarters and place in thermomix bowl. Process for 5 seconds on speed 4. Scrape down sides. Add oil and heat for 2 minutes, 90 degrees and speed 1.
  2. Add in roughly chopped zucchini and process depending on how chunky you want your zucchini. For this house it's finely chopped all the way so I do a couple of seconds on speed 4. If you want chunky just press turbo once or twice.
  3. Add in eggs, feta and flour. Process for 5 seconds on speed 3.
  4. **Pour into a lined square tin and bake for about 25-30 minutes in a 200C/400F oven until nicely golden on top.
  5. Leave for a couple of minutes in the tin then slice and enjoy.
  6. If you don't have a thermomix then just make it all in a food processor and if you don't have a food processor, grate the onion and zucchini. Lightly saute your onion for a few minutes. Whisk the eggs and combine all ingredients and follow from **.


my retro kitchen

My house has the lived in look. I’ve perfected it over the years. I could get a 10 out of 10 for making a house look like a family lives in it.  I can swiffer my lovely dark new floors as many times as I like but it only takes one packet of jatz or some toast and all the hard work is gone. Our dining room table usually represents a dumping ground for homework, newspapers, keys and the like.

And kitchen counters have bottles, sterilising stuff, the jug, the coffee jar, toaster, thermomix, biscuits and well…………..more stuff. Counter and cupboard space is pretty tight in this kitchen. The sink is home to things that need to be washed or things left out to dry. A chux hangs over the tap. Teatowels hang around. But there was none of that today.

I had a photographer coming today and I had suggested a picture in my kitchen. If it was my old house (check it out here) with the fancy new kitchen then of course the kitchen would be the perfect place for a photo. But you know what. I actually loved my kitchen today. It was so clean and tidy and I embraced the retro.

Of course it only took one mealtime and a few snacks to get the kitchen looking a bit more normal and give us a few more days and we’ll be back to the usual look. But for today it was fun. Of course retro daddy is loving it like this but I can’t find a thing.

And while we’re speaking about the house what has happened with the renovating, you say? Well retro daddy finished painting the staircase last weekend and it’s looking fabulous. He knocked it over in 2 afternoons! He has the skirtings and windows in a room upstairs (since the painter left!) and then I will be paying the deposit on the carpet and getting it installed in the next month or so. I won’t miss the wooden steps once the carpet is down but considering this was the before . Well it’s looking pretty fabulous!

And I’ve been saving for the carpet myself and I must say that as hard as saving can be (I’m a spender),  it’s a nice feeling knowing that we’ll be paying cash for it and have worked towards a goal. I think it sends a good message to the kids too. They know that the reason we don’t have carpet on the stairs or haven’t replaced the green upstairs is because we’re saving for it. And I like that!

p.s did you see my photobomber!

p.p.s wait till you see the photos from today!! the very talented James Horan came out to the house and combined with the makeup talents of the very lovely Wayne Chick…..well I’m pretty excited to see them!

tillie + finn in shop 4 kids

Oops! Life has been so busy I totally forgot that I hadn’t shared the super cute pics of my twinnies from the photo shoot they did for Shop 4 Kids. I shared it on Facebook in all my excitement the day the magazine came out and forgot to share here. Silly me. So this all came about because there was a call out on the Shop 4 Kids facebook page for a fashion shoot involving twins. I have twins.

I knew tillie would love it – did someone say hair and makeup and putting on a show. Tillie is our resident diva.  I thought Finn would need a bit of warming up………….which he did. Once we’d negotiated that he wasn’t going home.

Finn swapped preppy for homeboy and here are my fave pics…………after they’d warmed up to the camera.

You can see their pic in the current issue of Shop 4 Kids. Clearly these are the professional photographs and not my own! So thank you Shop 4 Kids for the photos. We had an absolute ball!


joining a local organic fruit & veg co-op

Last week I was super excited to be making my first order as part of a local organic fruit & veg co-op. And I’ve had a couple of questions about it so I thought I’d put down my thoughts for you. You would be right for thinking that I had been using Aussie Farmers last year but the quality was inconsistent and one week I received 2 bunches of black bananas in my delivery. I couldn’t believe someone could have packed that box! The bread wasn’t fresh, I had leaky milk twice and after a couple of other things I just had to say that it wasn’t for me.

OK so the way the co-op works is about 10 families order via a spreadsheet each fortnight.  Everything is ordered in bulk and you can order organic grocery items as well as fruit and veg. If there are enough people who want the same item – say 20 kgs of potatoes or 20 cans of chickpeas and the bulk quantity is split between enough people then that  item is ordered. If you don’t want the entire bulk amount or there aren’t enough people to share with you, then it isn’t ordered. But not all items are bulk – like herbs, butter, egg cartons etc.

You pay a small admin fee each order as one person in co-ordinating the paperwork and payment side of things. And once every 2 months you are required to pack the orders with another person in the co-op and it can take about 3 hours of your time sorting and packing. Unfortunately it’s on a monday afternoon before school pick up and with 4 little ones here with me it wouldn’t work.  You also collect your own boxes from someone’s garage when the packing is done and it’s up to you to check quantities and the items are correct while you are there. Kind of hard with 5 kids in tow……………..

But the savings are huge. That is probably the biggest thing that attracted me to the group and the quality of the food was lovely. Half of my kitchen table was covered in fruit and veg for the fortnight and it’s organic!  So if you are into organic products and you know that you pay more in the stores or through a delivery  company then this is a great option. My order included some dairy, some grocery stuff, loads of fruit, vegies and some fresh herbs. I haven’t been invoiced yet but I’m expecting it under or around the $200 mark. And we’re talking about 4 boxes overflowing with food. I’ve looked into organic delivery boxes and it’s a lot more expensive.

But for me it was a bit of a disaster, I went to the wrong house, had to go and pick up everyone from school, go to the right house where I had no idea what I was doing, I took the wrong butter that I later had to drive all the way back and return. So at the end of day I left home at 2.15pm and we finally got home and in the door for good before 6pm because of the trips back and forth.

One of my readers said on facebook that in their organic co-op the first few deliveries are done to your house to help out the newbies. Nice. I think a great one pager of how a co-op works is a great idea. That way when people join they have everything spelt out on a page and can take it with them for the first pick up and know what they’re doing. It was all messages here and there and me calling and trying to work it out. It just wasn’t meant to be for me right now  but maybe in a year or so when I have less babies at home and can really commit to the packing and also the picking up and loading up the car on my own. The savings and quality were very attractive but I think door to door is going to be my best option.

Do you have a co-op or are part of one? How does it work and why does it work for you?

passionfruit sour cream cake

I think my middle name could be cake right now with the number of cake recipes that have been on the blog lately. And the most popular so far seems to be my vegan chocolate fudge cake! But I promise that food moves fast in this house and I might get a slice (maybe two if I’m lucky) and then it’s all gone. And so it was Sunday afternoon. I only had 100g butter left in the fridge but 2 tubs of sour cream so I decided I’d also use up that can of passionfruit at the back of the pantry and make a passionfruit cake in the thermomix. Decision well made.

This is light and delicious. You could ice it with my cream cheese frosting here or a simple icing with some more passionfruit mixed in. It’s up to you. We did try leaving the cake to fully cool and I was going to ice it but then we just couldn’t resist. We ate it for afternoon tea and the rest for lunchboxes and morning tea the next day. That is how long cake lasts in this house, one or two days max.


Oh and I think everyone needs a love heart cake tin. I bought this in Paris when retro daddy was working there and I was lucky enough to spend weekends there. And I carted it around everywhere we lived in London and back in Australia still all packaged up because it was just a bit too special. But actually it’s turned out to be my favourite cake tin. So there you go. It’s made by Tefal and I’m pretty sure you can get one without having to go to Paris but it does make it special.

Does that not look like a deliciously light piece of cake. This is definitely a crowd pleaser and a great cake for the family.

5.0 from 1 reviews
passionfruit sour cream cake
 
Prep time
Cook time
Total time
 
Author:
Recipe type: Baking
Serves: 16
What you'll need
  • 100g unsalted butter, softened
  • 1 cup raw sugar
  • 1Tbsp vanilla extract
  • 2 eggs
  • 200g light sour cream
  • 170g can of passionfruit (or a few fresh passionfruit)
  • 2 cups of self raising flour (I used 2 cups plain flour with 1Tbsp bicarb)
Instructions
  1. Place raw sugar in thermomix bowl and process for 10 seconds on speed 9. Scrape down sides of bowl, add in cubed butter and process 20 seconds speed 4.
  2. Scrape down sides and add in vanilla and eggs. Process 10 seconds speed 4.
  3. Add in sour cream, passionfruit and mix for 10 seconds speed 4.
  4. Add in flour and mix 10 seconds speed 4. Scrape down sides well
  5. **Tip into buttered and floured cake tin (at least 20cm) and bake in preheated 180C/350F oven for about 40 minutes.
  6. Leave in tin a couple of minutes then tip onto cooling rack.
  7. If you want to ice it then wait till is cake is completely cooked.
  8. If you don't have a thermomix then cream the butter and sugar. Add in vanilla then eggs one at a time mixing gently. Add in sour cream and gently combine. Then sift in the flour and combine the mixture together. Follow from **


pasta e fagiole in the thermomix

One of the reasons I just love my Thermomix is it makes a super fast  dinner from a few ingredients. Pasta e fagiole (pasta and beans) is one of those dishes. And I don’t have to juggle a few saucepans on the stove. It does the cooking and stirring for me and I can be doing other things. And at 5pm on a weeknight I’m usually running around doing 50 million things. I’ve shared another easy pasta recipe, summer pasta here.

Now if you have a Thermomix then you have the Pasta e Fagiole recipe in your Everyday Cooking book that came with your thermomix. BUT I have tasted different versions of this dish at thermomix demos and I just love the way I make it. I know, I’m so modest.  And I’ve been asked a couple of times and here it is. I make this quite a bit because it’s healthy, fast, very budget friendly and the kids eat it. And if the kids eat it then it really is a winner.

Now when it first comes out of the thermomix it’s very soupy. So you add some cheese and leave it for about 3-5 minutes. The cheese melts, the sauce thickens and you’re ready to go. Oh and if you’re retro daddy then you like tomato sauce with it. Not me.

pasta e fagiole in the thermomix
 
Prep time
Cook time
Total time
 
This recipe comes from the Everyday Cooking book that comes with your Thermomix in australia. But this is how we make it and enjoy it
Author:
Recipe type: Vegetarian
Serves: 6
What you'll need
  • 1 brown onion
  • 2Tbsp oil
  • 2 sticks celery
  • 2 tomatoes
  • 1 can chickpeas or butter beans, drained
  • 2tsp Vegeta stock powder
  • 350g macaroni
  • 1 cup grated low fat cheese
Instructions
  1. Peel onion and chop in half. Place in thermomix bowl with oil and process for 5 seconds on speed 7. Scrape down bowl.
  2. Cook onion for 2 minutes, 100 degrees on speed 1.
  3. add in the washed celery (break each stalk into threes and include the leaves), tomatoes chopped in half, stock and the drained can of beans.
  4. process for about 15 seconds on speed 6.
  5. Add 900g of water and cook 10 minutes, 100 degrees, speed 1.
  6. Add pasta and cook 10 minutes, 100 degrees, reverse and speed soft.
  7. Place into thermoserver or a large bowl, stir in the grated cheese and put a lid over the top. Leave for about 3 minutes.
  8. Season if you like and enjoy.


chocolate bunny brownies

This recipe goes out to everyone who has chocolate easter eggs or bunnies coming out of their ears. We are surrounded with chocolate. And I was looking through my books for a few recipes I could use and just decided to change my chocolate brownie recipe to use up some chocolate. Some of you probably can’t even look at chocolate this morning but the kids could and loved this recipe today.

and I think this photo needs a bit of explanation, this is my own raw caster sugar made in the Thermomix. Yes, you can buy your own raw caster sugar but let me tell you that I love doing my own caster and icing sugar and not have 50 million types of sugar in the pantry. Just raw sugar. Ok back to the photos

 Enjoy……………….this made a bit of a dent in the chocolate stash in our house today.

5.0 from 1 reviews
chocolate bunny brownies
 
Prep time
Cook time
Total time
 
Author:
Recipe type: Baking
Serves: 12
What you'll need
  • 400-450g chocolate easter eggs/bunnies (hollow)
  • 250g unsalted butter
  • 1 cup raw caster sugar
  • 3 eggs
  • 1Tbsp cointreau (optional)
  • 1 cup SR flour
  • 1¼ cup plain flour
Instructions
  1. Break up the bunnies and place in a glass bowl with cubed butter.
  2. Melt in microwave for about 3 minutes on medium/medium high until chocolate and butter are both melted
  3. Stir in sugar and mix well. Add in the eggs, mix well then the cointreau
  4. Sift in the flour and gently combine
  5. Pour into a lined or greased tin and bake in a preheated 160C/320F oven for 30 minutes until top is crispy. I did this in a silicon pan so don't grease the silicone or it gets too greasy.
  6. Remove from oven and leave to cool completely. This is the important step. It will be really crumbly if you don't. So leave it. Just walk away. I know you want to eat it
  7. When cool slice and enjoy


my first shawl is finished

Well today I finished knitting my very first shawl. And as I was knitting it I was absolutely convinced that I would never knit another shawl again. Quick project they are not. But actually now that it has been blocked and modelled I just love the shawl. And I’m ready to cast on another one. Call me crazy. Ravelry details are here.

And when I started this shawl I had visions of myself doing some very stylish shawl photos that you see on ravelry. Arms out and the shawl in all its glory. But when you’re the mother of 5 little ones it looks more like this….

and this………….mummy tummy and all

and I had to give retro daddy a crash course in how I wanted the pictures to look. So no better way to do that then have him model and show him the photo……getting in touch with his feminine side.

and here I am with the pose I really wanted!

Now I have to say that the colour is so amazing, a few shades of purple in the wool just make this pretty special and I’m sure the total cost for this would be about $16 or so. Sure to keep retro daddy happy AND I used up some of the stash too

Ravelry details are here. Pattern is called Textured Shawl Recipe by Orlane here and I followed the instructions for Famous Country. Except that I ran out of wool. Minor problem. So I did a smaller band of garter stitch. But this is super easy – if you can knit, purl and make 1 (m1) then you can do this shawl). The wool is Bendigo Woollen Mills Allegro which is no longer available unless you can find some on ravelry here.

And this will be heading off to Oklahoma for the dear sweet mum of our friend Nicky who was tragically taken too soon. It was my little way of doing something special and thoughtful. And I couldn’t be more in love with this if I tried. It’s just perfect and a winner. And if you haven’t made a shawl yet then just do it………if only just to get some great posing with it when you’re done.

easter means something to me

Well easter is upon us and the older I get the more it means to me. And this might be a post just for my Christian readers out there.  In fact I get more emotional at Easter than I do at Christmas. Growing up we always did mass every sunday and especially Easter but never the Good Friday service. Retro daddy loves to tell the kids about hanging out at home every year in his sunday best after getting home from stations of the cross and waiting for the 3pm service. And so when we got married we started going to the 3pm Good Friday service and I fell in love with it.

It is so moving and I always shed a tear. It was so new to me when we started going but it is full of so much tradition and just a beautiful way to celebrate easter. This year, Good Friday coincides with the 2 year anniversary of losing my dear mum. So tomorrow’s service is set to be the tear jerker of all tear jerkers for me. It was my faith that got me through the hardest of days. That answered my questions of why we have to lose our loved ones and to know that there is something better waiting for us.

And it made me realise that life is to be lived. That my purpose here is to have my family and to live a good life. Before that I always had those questions like why am I here and what happens when I die. I used to get into a panic when I’d think about what would happen when life is over here. But those questions don’t really pop into my head as much because I know I’ve given life to 5 little people who will go on to have their families.

Today I had Finn home with me and when we got to the cemetery I asked him to say a little prayer – I thought he’d just stand up but he knelt down and said a quiet little prayer. Oh what a sweet boy.My job is done with him. Meanwhile I managed to turn a pretty floral arrangement into a total mess trying to poke the stems into the holes of the pot.

And I’m not much of a bible quoter here on this blog as I know we come with different beliefs and backgrounds and in fact I might have just said last week I don’t do bible quotes on this blog. But heh it’s easter and this is something that gave me such peace and still does……………………

“In my Father’s house are many rooms; if it were not so, I would have told you. I am going there to prepare a place for you. And if I go and prepare a place for you, I will come back and take you to be with me that you also may be where I am.” John 14:2-3.

And so I wish you a very happy and holy easter weekend and time with your loved ones. And if you are thinking about going to church this Easter but not so sure. Well just go. It fills a place in my heart that nothing could ever fill. And I’m so grateful to my mum for my faith and bringing me up with it.

Corriexxxx


easter cake to feed the masses

Well I am so last minute with easter this year! I had to get the conference and quilting day behind me and now easter is this weekend. How did that happen. I have a date tomorrow at the mall for some serious last minute easter goodies. Anyway, this morning I had 3 brown bananas sitting in my fruit bowl and I knew I had to do a new recipe. It’s been a long time between recipes. But I couldn’t find my all time favourite hummingbird cake recipe which is an AWW one that is so delicious. Really rich, dense and beautiful and so nice for this time of year.

So I pulled out my CWA bible and decided I’d convert their hummingbird recipe to the thermomix and have a play with it.  But there is a problem with the recipe so I turned that into a good thing and got 2 cakes out of the one recipe. A bonus when you have a big family of cake eaters. It’s light (no, not in the calorie department), fresh and absolutely delicious. But then again anything with cream cheese frosting is delicious in my books.

I love to do all my icing/frostings in the Kitchen Aid but I do all of my icing sugar in the thermomix. You just pop in sugar – I love raw sugar- and I process it up to 20 seconds and get delicious icing sugar. It means I don’t need to keep caster or icing sugar in my pantry just raw sugar and I’m prepared for any baking.

And I have to share a photo of one of my garden beds……….I’m not a garden blogger. Can you tell? Just keepin’ it real for you all. I put my time and love inside the house and not always outside. But I do always have good intentions for my garden…….just haven’t found the time yet.

Happy easter and happy baking……………..

easter cake to feed the masses
 
Prep time
Cook time
Total time
 
This recipe makes 2 round cakes and is delicious
Author:
Recipe type: Baking
Serves: 24
What you'll need
  • 300g raw sugar
  • 3 ripe bananas
  • 2 eggs
  • 425g can pineapple pieces in syrup
  • 150mls/1cup canola oil
  • 1 Tbsp vanilla essence/extract
  • 500g plain flour
  • 1tsp bicarb soda
  • 1tsp ground cinnamon
  • 1tsp ginger
  • 80g pecans, roughly chopped
  • 50g butter
  • 250g light cream cheese
  • 1-2 cups icing sugar/raw sugar made into icing sugar in thermomix
Instructions
  1. Place raw sugar in thermomix bowl, process 10 seconds on speed 9.
  2. Add in banana in chunks, pineapple and the syrup, oil, vanilla, eggs and process 10 seconds speed 5.
  3. Add in dry ingredients and process 10 seconds, speed 5.
  4. Add in pecans and process 10 seconds, speed 1, reverse. Pour into 2 greased and lightly floured cake tins and bake in preheated 160C/320F oven for about 50 - 60 minutes until cakes are cooked right through.
  5. Turn out cakes onto cooling racks and leave to cool.Ok we ate some of the 2nd cake as we couldn't wait.
  6. Place butter and cream cheese in mixing bowl, beat together and gradually add in icing sugar until you get the right consistency. The more icing sugar you add the stiffer the icing/frosting.
  7. Enjoy.