I found hydrangeas!

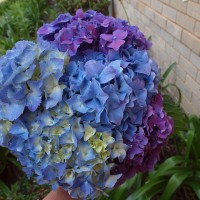
If you’ve been reading my blog for a few years then you know that I just love hydrangeas. They’re a little bit nana-ish and a little bit retro but I just can’t get enough of them. And this is the time of year that I get to appreciate them! Lucky for me we have some at our house because it’s the first summer that we’re here. We are only the 2nd owners here and the original owners loved gardening. I’m not sure they’d be impressed with my efforts since we moved in. I’m lucky to remember to water everything but there are some gorgeous plants dotted around the place and thankfully most of them are doing well with minimal attention!

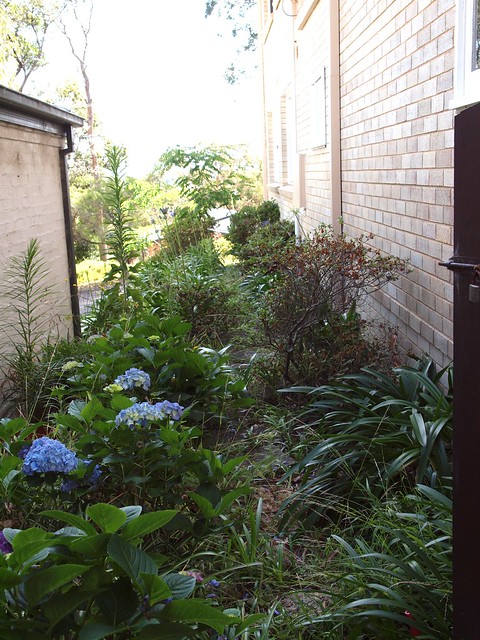
I knew we had hydrangeas down the side of the house but I hadn’t been out there for months. Today I went out and discovered all of these gorgeous blooms. It’s a little overgrown out there (understatement of the year!) and needs a bit of attention but picking these just made my day!

I just can’t get enough of them! I put them straight into a big jug and put them in the kitchen. And maybe I just dreamed of how perfect they’d look if my kitchen was all white with caesarstone and big pendant lights hanging over the top. But that’s ok. One day I’ll have my dream kitchen again………….and in the meantime the jug looks perfectly at home with the retro brown wall in the background!

Moral of the story is to get out there in my garden more often. I really need to do that this summer! Are you a gardener? Or do you just love the end result and not the work in between!

big boy emerson

Oops I think I’ve missed a few updates on Emerson. I started out well but he’s the 5th baby so I tend to just take photos on instagram rather than take a picture of every single thing he does like you do with your first baby. I think I can sum up emerson in 3 words…….big happy baby. Retro daddy keeps saying ‘I know we can’t say who is the cutest baby but I really think emerson is our cutest baby’.

And look at him….he has that perfect roly poly baby look going on right now. And he’s always happy. We had a little blip with his bronchiolitis which made him cranky and he still has a cough that makes people turn and stare but he’s happy!

And he’s oh soooo snuggly when he’s in his wondersuit. I know there are fancier jumpsuits out there but I love little babies in a cuddly bonds suit. You just want to snuggle up against him.

and here’s the money shot that I snapped on instagram – I think it has a little fred astaire quality about it. Looks like he’s kicking his heels together. And combined with his sweet little happy face I’d say it’s a perfect snapshot of him at 4 months.

OK, well that’s enough bragging about that cute baby of mine. How about the quilt he’s on?  No, I did not make it. The very talented Rita of Red Pepper Quilts did and I bought it. And that’s all retro daddy needs to know. It’s a need to know basis.  I was going to put it away until Christmas but I had to put emerson on it and just admire the whole quilt. We have a lot of girly girl quilts in this house but now emerson has one for his room and to be a model on. And it’s perfect. But now it’s wrapped up and we’re not touching it till Christmas.

yes, there has been craft

You’d be forgiven for thinking there was no craft on this blog any more. I’ve just had another crazy busy week here with work due left right and centre and a sick bub added to the mix. It’s been hard to find the time to squeeze a bit of craft in but a couple of rows of knitting helps me feel calm. I make the time to squeeze it in. I can’t remember the last time I got on the cross trainer or went for a walk but I can tell you when I’ve done a bit of knitting.

I’ve also been finishing my floppy doll for my doll making class…..everything in the doll is natural right down to the 100% cotton for the stitching. And I quite like all the stitching – even if I was totally last minute and sewing up the doll a few hours before class started.

We make 2 dolls during the course, the first is a floppy doll. I hadn’t even sewn on the face or put on the hair and elodie was already grabbing the dolly from me. It’s a good sign because thankfully she’ll overlook any flaws in the doll. At the moment I’m just adding hair – a process that takes a while. Especially when you’re a chatterbox like me.

And my dolly needs a few more strands at the front to avoid the ‘I just gave myself a lopsided fringe’ look that she’s currently sporting.  And she looks a bit like a boy except for the pink. But it’s my first doll and I’m learning. It’s all about learning right now. And the next time I look at a sweet waldorf doll I will have a much better understanding of how much work went into it!

cranberry + pistachio shortbread

We all needed a bit of a pick me up this morning. Emerson had a trip to the hospital last night with breathing problems. Turns out he tested positive for RSV (I had to google it)  and apparently it’s very common in little ones but it’s actually rather scary when they are so little as he was so wheezy and in distress. He’s not a happy camper today and anyone who has met emerson knows that he is ALWAYS happy and smiley so he’s getting lots of cuddles and retro daddy and I are taking it in turns to sit on the couch with him and pass him between us

Thankfully we have a special mass at school today so our morning mass wasn’t on and it’s 4pm instead. What timing. We all slept in and stayed in our pjs. And I realised I didn’t have a blog post scheduled for this morning and we had no biscuits or cake in the house either.  So I thought I’d make something sweet and blog about it. I always love to do shortbread at Christmas time and with a scottish grandma it always goes down well.  I always do a plain version but I had some pistachios and cranberries left over from the rocky road I made last week and decided to give them a try. And I have to say that this is a winner.

If you have a Thermomix then you’re going to love this recipe because you can get all earth mothery and say I made this shortbread from scratch – I ground the rice to make rice flour and made my own caster and icing sugar. And I only buy rice flour at Christmas time and then it sits in my pantry for the rest of the year so I love making my own rice flour. It’s genius. But if you don’t have a Thermomix, don’t worry. I’ve made a recipe card for you too. I’m nice like that.

cranberry + pistachio shortbread
 
Prep time
Cook time
Total time
 
perfect for Christmas!
Recipe type: baking
Serves: 12
What you'll need
  • 100g rice or rice flour
  • 75g dried cranberries/craisins
  • 50g pistachios (shelled, unsalted)
  • 250g butter, cold and cubed
  • 100g caster sugar
  • 200g plain flour
  • dash vanilla extract/essence
  • icing sugar to serve
Instructions
  1. Place rice in TM bowl and mill on speed 9 for up to 2 minutes. Set aside
  2. Place cranberries and pistachios in TM bowl and on closed lid setting pulse on Turbo two times. Set aside.
  3. Place caster sugar, rice flour, butter, plain flour and vanilla in TM bowl and process 20 to 30 seconds on speed 6.
  4. Add in cranberries and pistachos and process for at least 1 minute on closed lid setting and interval speed. I then like to tip out to a big bowl and check the fruit and nuts are distributed evenly. It's just nice to get your hands in and taste the mixture, of course.
  5. Divide mixture into 2 and form each into a flat round on lined baking trays. I like to flatten to just over 1cm in thickness, pinch the edges between two of your fingers and make it look all pretty.
  6. You can also just refrigerate your dough at this stage just form into a ball, wrap well in gladwrap and refrigerate for later in the day or freeze for another day.
  7. Bake in a preheated 160C/300F oven for at least 30 minutes - I left this in for 40 minutes and so it's looking a little golden but try to keep your shortbread as pale as possible.
  8. When it comes out of the oven grab a regular knife and gently trace lines in your biscuit and with a fork make a few pricks in the biscuit around the circle. You don't want your knife to touch the bottom just go half way through your mixture.
  9. Leave to cool completely, dust with icing sugar and serve or wrap up and giveaway.

 
cranberry + pistachio shortbread
 
Prep time
Cook time
Total time
 
this is for the non thermomix readers out there
Serves: 12
What you'll need
  • 100g rice flour
  • 75g dried cranberries/craisins
  • 50g pistachios (shelled, unsalted)
  • 250g butter, cold and cubed
  • 100g caster sugar
  • 200g plain flour
  • dash vanilla extract/essence
  • icing sugar to serve
Instructions
  1. Roughly chop cranberries and pistachios.
  2. Place caster sugar, rice flour, butter, plain flour and vanilla in food processor or kitchen aid and mix together for at least 1 minute.
  3. If you want to go old school rub your butter into the flours with your finger tips before adding sugar and vanilla.
  4. Add in cranberries and pistachos and using your hands or a wooden spoon ensure they are evenly distributed throughout the mixture.
  5. Divide your mixture into 2 equal balls and form each into a flat round on lined baking trays. I like to flatten to just over 1cm in thickness, pinch the edges between two of your fingers and make it look all pretty.
  6. You can also just refrigerate your dough at this stage by just forming into a ball, wrapping well in gladwrap and refrigerate it for later in the day or freeze for another day.
  7. Bake in a preheated 160C/300F oven for at least 30 minutes – I left this in for 40 minutes and so it’s looking a little golden but try to keep your shortbread as pale as possible.
  8. When it comes out of the oven grab a regular knife and gently trace lines in your biscuit and with a fork make a few pricks in the biscuit around the circle. You don’t want your knife to touch the bottom just go half way through your mixture.
  9. Leave to cool completely, dust with icing sugar and serve or wrap up and giveaway.


Let me know if you’re a fan of baking shortbread too! This one is deliciously buttery, just how I like it and I love the festive colours in it.

I’m making a waldorf doll

Last night I went out. At night time. Something I don’t really do since I’m usually getting little people bathed and into bed. But I went out to a gorgeous little waldorf doll making class. And I loved it. We started making the head of a little doll to give to a baby and I can see I need some work in the head making department. Here is my progress so far.

But don’t worry if that doesn’t look like a doll’s head. Because you then stretch over a piece of flesh coloured knit over the top…..see, we’re starting to look a bit more like a head aren’t we?

And of course in true retro mummy style I talked too much and had emerson in a sling on me so the other ladies in the class are all ahead of me and finished their heads but I’ve got a bit of homework. And this is the kind of homework that I won’t mind doing. In fact if I had to go and sew and make dolls all day I’d be one happy content lady.

The reason I went to the class is that I’ve just discovered waldorf/steiner dolls and they are adorable. They are completely handmade and I love how the teacher told us that she makes all of her dolls by hand so that you can give them away to a child and know that they are completely made by hand. That just hits the spot with me and why I love to knit. Knowing that my hands have made something and turned a ball of wool into something special.

And these gorgeous images came from two books I picked up on etsy recently. They are actually written in french. And no I don’t speak french – I speak high school french but I figured with a doll making course behind me and pictures and google I can get there.

I know some of you share my love of these beautiful dolls so tell me what you love about them? For me it’s the sweet rosy little faces and being handmade from top to bottom. I just adore them and so do my girls…….

pineapple fruit cake

I love cake………..but you probably already knew that. And one of the things I love to do in the lead up to Christmas is bake fruit cakes. I’ve made a lot of fruit cakes in my time and retro daddy has tasted a lot of them. I’ve always found the easiest and most foolproof recipes to make are the boiled fruit cake. They don’t take as long in the oven, you don’t have to soak your fruit beforehand and you still end up with a delicious cake. But I was flicking through a CWA cookbook and found pineapple fruit cake and knew I had to make it this Christmas.

and retro daddy thinks that this is the best fruit cake I’ve made. He normally likes to offer a little constructive criticism when I ask him to taste something  – he obviously takes his job very seriously – but I got nothing but praise for this one.  But this recipe wasn’t without fault. You see the recipe called for a can of pineapple pieces, I re-read it a couple of times because I’ve used crushed pineapple in my hummingbird cakes but not pineapple pieces.

So I made up the boiled mixture and then as I looked at it I thought those big pineapple pieces are just going to get a bit wet and soggy in the cake. So I did a quick google search and realised that I should have been using crushed pineapple. So I picked out each and every piece of pineapple, chucked them in the Thermomix and processed them on turbo a couple of times and voila, I had crushed pineapple and put them back in the mixture and you’d never know.

So do you love fruit cake at Christmas and do you make your own? Maybe your fruit is already soaking in brandy or you’ve got a cake stashed away. Let me know what you’re doing…….

5.0 from 2 reviews
pineapple fruit cake
 
Prep time
Cook time
Total time
 
delicious and easy!
Author:
Recipe type: Baking
What you'll need
  • 500g mixed dried fruit
  • 50g glace cherries (optional)
  • 450g can crushed pineapple
  • 125g unsalted butter, cubed
  • 1 cup sugar (I used caster)
  • 1 tsp bicarb soda
  • 2 eggs, lightly beaten
  • 1 cup plain flour
  • 1 cup self raising flour
Instructions
  1. Place dried fruit, pineapple (don't drain it), butter, sugar and bicarb in a saucepan and bring to the boil on a medium heat.
  2. Remove from the stove and leave to cool. I like to transfer to a big bowl and leave it to cool
  3. Add in eggs and mix well. Sift in the flour and mix it in well. Make sure there is no flour left at the bottom of the bowl. Nothing worse than discovering this once you've put most of the mixture into a lined tin.
  4. Pour into a lined square or round tin and place in a preheated oven 180C/350F and bake for at least 45 minutes to 1 hour.
  5. Now the cooking time will depend on your oven and the size of tin you use. Just check it with a knife or skewer at 45 minutes and if it comes out clean (don't stick it straight into a piece of fruit!) then you're done. If not put it back for another 10 minutes and test again.
  6. You can pour some brandy or alcohol over the top of your cake if you like but I soaked my fruit in brandy for 2 days before the cake was made.
  7. Leave to cool then slice and enjoy.


Entertaining – the recipes

Here you’ll find the delicious recipes I made here


5.0 from 1 reviews
Artichoke tartlets
 
Prep time
Cook time
Total time
 
people will be asking you for the recipe!
Author:
Recipe type: Vegetarian
Serves: 12
What you'll need
  • 12 slices Woolworths white bread
  • butter/margerine to butter bread
  • 1 small jar artichokes
  • 2 Tbsp Woolworths Select Whole Egg Mayonnaise
Instructions
  1. Butter one side of each slice of bread.
  2. Using a mug or glass cut a circle out of each slice of bread that is larger than your muffin/patty pan try.
  3. Place bread butter side down into the tin
  4. Finely chop artichokes and add in the mayonnaise, season well with pepper and spoon into each bread case
  5. Bake for about 15 minutes in a 180 degrees preheated oven. You want a nice golden brown colour on the bread.

 
5.0 from 1 reviews
Smoked salmon vol au vents
 
Prep time
Cook time
Total time
 
Super simple and tasty
Author:
Recipe type: Appetisers
Serves: 12
What you'll need
  • 1 packet Woolworths Select vol-au-vents
  • 125g Woolworths Select spreadable cream cheese
  • 50g smoked salmon
  • chives/dill/parsley
Instructions
  1. Place vol au vents on a baking tray and bake for about 10 minutes in a preheated 160 degrees oven.
  2. Meanwhile in a food processor or thermomix combine cream cheese, smoked salmon and herbs for at least 20 seconds
  3. Using a teaspoon spoon a little of the mixture into each case and serve.

 
5.0 from 1 reviews
Capsicum + cashew dip
 
Prep time
Total time
 
quick, easy and looks great too
Author:
Recipe type: Appetisers
Serves: 24
What you'll need
  • 1 jar Woolworths Select chargrilled peppers
  • 160g Woolworths Select raw cashews
  • 2 Tbsp grated parmesan cheese
  • dash of olive oil
  • pepper
  • Woolworths Select salted crackers
Instructions
  1. In a food processor combine the drained red peppers, cashews, parmesan and olive oil. Season to taste and serve with crackers.

 
5.0 from 1 reviews
White Chocolate Rocky Road
 
Prep time
Total time
 
Delicious and easy. If you want pink and white marshmallows then just use 1 bag of marshmallows in your recipe
Author:
Recipe type: Chocolate
Serves: 12
What you'll need
  • 2 x 200g Woolworths Select White cooking chocolate
  • 2 bags Woolworths Homebrand marshmallows (you just want the white ones)
  • 1 small bag Woolworths Select raw pistachios
  • ½ bag Woolworths Select dried cranberries
  • 2 Tbsps Woolworths Homebrand desiccated coconut
Instructions
  1. Break up chocolate into pieces and place in microwave safe bowl. On medium heat melt the chocolate for about 2-3 minutes, stirring frequently.
  2. Add in marshmallows, pistachios and cranberries.
  3. Pour into a silicone lamington tray or lined lamington or square tin and sprinkle with the coconut
  4. Refrigerate at least 30 minutes, cut into pieces and serve.
  5. This keeps well in an airtight container in the fridge
  6. now if you want pink and white marshmallows in your rocky road just buy 1 bag. I picked through 2 bags for all of the white ones to keep it in Christmas colours!

 
5.0 from 1 reviews
Lemon + berry tarts
 
Prep time
Total time
 
So simple but so stunning. All you need to do is assemble this one
Author:
Recipe type: Desserts
Serves: 6
What you'll need
  • 1 packet Woolworths tart cases
  • 1 jar lemon curd
  • 1 punnet blueberries
  • Woolworths Homebrand icing sugar, to serve
Instructions
  1. Place about tablespoon of curd into each tart case, top with berries and just before serving dust with icing sugar using a sieve.

 
5.0 from 1 reviews
Choc dipped strawberries
 
Prep time
Total time
 
an oldie but a goodie. You can use bananas, cherries, mandarins, marshmallows or whatever you have going. Everything tastes better with chocolate.
Author:
Recipe type: chocolate
Serves: 12
What you'll need
  • 100g Woolworths Select Milk or Dark Cooking Chocolate
  • 1 punnet strawberries
Instructions
  1. Wash and pat dry strawberries leaving the stalks on
  2. Break up the chocolate and place in a small microwave safe bowl. Heat for 1-2 minutes on medium stirring frequently.
  3. Dip each strawberry into the chocolate half way and allow chocolate to drip off
  4. Lay on a piece of baking paper on a plate and repeat with the rest of the strawberries
  5. Refrigerate until needed

 
5.0 from 1 reviews
champagne cocktails
 
Prep time
Total time
 
I've made a lemonade version for the designated drivers and pregnant ladies out there
Recipe type: Drinks
Serves: 6
What you'll need
  • sugar cubes
  • angostura bitters
  • champagne or lemonade, chilled
Instructions
  1. pop a sugar cube into the bottom of a champagne flute
  2. place a few drops of bitters over the sugar cube
  3. slowly pour in the champagne or lemonade
  4. enjoy

your questions about working from home

Thank you so much for the great response you’ve given me to my blog post about working from home with little ones. It’s funny how something I just take for granted because I’ve been doing it for so long can offer information and help you out at home. I really need to do this more often because I just assume everyone knows how to do it or is doing it. And you’ve asked some great questions and I decided to put them all in the one place to help everyone.

So here we go……

1. How do you make money through your blog

This is such a good question. And one I get often. Bloggers make money in different ways and something that works for one blogger might not work or suit another. For me, sponsored posts are my bread and butter and I love them. This is what brings in most of my income and it’s something that really works for me and allowed me to close down my online store. I did my first sponsored post with nuffnang about 2 years ago and just recently made the move to the Remarkables where Lorraine looks after my enquiries and sponsored posts. It’s a great arrangement and I love that Lorraine hand picks the bloggers she wants to work with.

I’ve been accused by a few of selling out and going all commercial for doing sponsored posts but my sneaking suspicion is that these armchair critics just wish they could be doing the same. Never did I think when I started my blog that it would become my job and my love at the same time. I just wanted to share my knitting projects and pictures of my new baby. That was all.

Other ways I make money are sidebar ads (those little buttons over on the right hand side of my blog), affiliate programs (I love fishpond’s affiliate program and you can check out amazon, the iconic and lots more affiliate programs that are popping up). Other bloggers have ebooks, are mentoring, teaching, speaking, writing for other sites/publications and running stores from their blog.

I’m always learning more about blogging each week and one of the things I’ve recently done is signed up to Google Analytics. It gives you so much information about your traffic and is so much more comprehensive than sitemeter which I was using before. Wow. I wish I’d been doing it earlier.

2. How do you grow your blog

I’m working on this one. There is no magic formula to make your blog grow. A blog requires your attention, consistent effort, time (oh the time), networking with other bloggers (you can do this online, blog conferences, PR events), you have to use your social media and most of all you have to love blogging. I don’t know any overnight successes in blogging but I know lots of people who have put in consistent hard work, are honest people on their blogs and have a real niche that sets them apart.

Have a read of this post I wrote recently on my top tips for blogging. I really recommend attending a blog conference, as scary and daunting as it can seem they are a great way to make friends and learn! And the next aussie blog conference is Digital Parents next March. Oh and if you want to get serious about your blog start reading problogger. He knows his stuff. I’m also loving the advice from Nikki of Styling You here.

Making friends with bloggers is a great way to promote each other, get advice, have buddies to attend conferences and events together and just help each other out. You want any relationship to be a 2 way street – don’t keep asking someone to do something for you without offering something in return. I love some of the close friends I’ve made through my blog who help me out, listen to me whinge on a bad day or when someone leaves something nasty on my blog and have become friends in real life.

3.How can I start a business with little or no money

That was me! I used my tax cheque after I had left work to start up my business and basically that cheque bought my stock. In the fabric business you generally needed to purchase at least $1000 with your first order to get a trade account with the big distributors. Not everyone works this way but back then I couldn’t get the super cute japanese fabrics I wanted from aussie distributors. I would do orders on my credit card as I had no trade references. $1000 is a lot of money when you’re on one income with a big mortgage. I’ve been there.

My best advice if you’re starting out with little or no money is don’t worry about the expensive customised personalised logos and websites. These are great if you’ve got lots of money up your sleeve or big ambitions but if you’re a mum who wants to sell her craft or just test the waters then put that money into supplies. I used premade logos from etsy and had my name put on them. Often you can pay a little bit extra to make it OOAK (one of a kind!). Same with my first store, just premade templates that were bought online and I installed. I know people that set up websites and pay web designers and then every little thing they wanted to change would cost money. Money they weren’t bringing in yet through the business. I always looked after my own websites, used the forums and taught myself how to use zencart and Mal’s cart. It pays to be a night owl and most of it is pretty easy to do yourself. But as a one woman shop you learn to do everything. And actually it’s fun. You are learning new skills in the process. And after 6 years of blogging I just paid the big $$$’s to have my own logo and website. It’s been a long time coming.

4. Madeit or etsy

If you’re going to sell handmade check out madeit (if you’re in australia) or etsy (if you’ve overseas or have overseas customers). I think using madeit is great because you’re less likely to get lost in it if you’re starting out compared to etsy which is just huge! And if you’re short on money use social media to your advantage! Get on facebook where the mummies are hanging out! I never paid for any advertising when I ran my store because I didn’t have the money and also because I used my blog and facebook and giveaways to get the word out there.

5. Where do I buy my fabrics wholesale in Australia

I was just asked this question this week and I used to get it a lot. The best place to go if you can are the quilt trade shows  – I would go to the Australian Quilt Market. There are now 2 each year – one in Sydney and one in Melbourne (coming up in a couple of weeks). They are full of the aussie distributors for fabrics, patterns and craft supplies. It’s crafters heaven, is a trade event and a great place to find wholesalers that suit your fabric style. Remember to ask their trade terms. Some of the distributors don’t require $1000 minimum orders so they might be the best place for you to start.  And if that all seems to scary bring a friend with you who you trust!

6. I want to start a business but I’m not sure what  I want to do

Yep, been there. Why do you think I did Avon and Tupperware. I was waiting for the right thing to come along and didn’t really know what I could do. Sometimes we have to start out with something just to get our confidence up. I know what it’s like to be stuck in the mummy day to day routine and think that we’re not up to it. We’ve been out of the workforce too long. No one will buy from me. I don’t have any money. It will be a flop. And so it goes on.

Starting small and achievable is the best way to go. Something that keeps everyone in the house happy and isn’t too much for you to handle. What do you love? What do you wish you could buy that isn’t out there yet? – I’m still waiting for someone to build the first drive through convenience store with milk/bread/chocolate and nappies for me! Maybe you have someone you trust to go into business with you. I can’t stress enough that starting small but with big dreams is something that we can all do. Look at some of the gorgeous knitting designers or ladies who are designing websites or photographing families or have a market stall. They all started somewhere small with friends as customers and grown from there. Ask people around you for their advice and go for it…….

Well I hope that answered a few of your questions. If you have any others just ask…….

retro mummy’s rum balls

Following on from yesterday’s post I thought I’d share an old favourite of mine. Rum balls. They are super simple and if you’re not into alcohol just use orange juice! Too easy. I just love making these to give away because I get to eat them while I’m making them. I think that’s why I love making edible gifts – it’s so fun to make them, eat them and then give them away. I always do this recipe in a double batch so stock up on a few madeira cakes and just pop them in your freezer if you’re not going to make them until closer to Christmas.


retro mummy's rum balls
 
Prep time
Total time
 
delicious and easy! they make a gorgeous present at Christmas time
Recipe type: Chocolate
Serves: 20
What you'll need
  • loaf of madeira cake (mine was 450g)
  • 1 cup icing sugar sifted
  • ½ cup cocoa
  • rum – enough to make the mixture moist (or orange juice)
  • coconut or chocolate sprinkles to coat
Instructions
  1. Slice off the brown edges of your cake then crumble the rest of the cake into a large bowl. Let the kids eat the edges of the cake.They love it.
  2. Sift in cocoa and icing sugar and stir well as you want it all evenly distributed. I use the back of a spoon to squash out any bigger cake bits too.
  3. Pour in rum (about 2 good sploshes) until you have the right consistency and your mixture is coming together. Mix well.
  4. Roll tablespoons full of mixture into balls and coat in coconut or chocolate sprinkles. Don’t worry if you can see little bits of cake, the mixture all comes together and they turn chocolatey in no time.
  5. Keep them in the fridge or package them up to give away. They look so pretty in little glass jars.


little christmas puddings

I love Christmas and I just love Christmas recipes. I was saying on facebook yesterday how I buy almost every magazine in the lead up to Christmas so I don’t miss out on any recipe or present ideas. And I’m such a sucker for my old faithful recipes that I make without fail every year – rocky road, fruit mince pies, rum balls and Christmas cake. But every year I like to try a couple of new recipes and see if they go down well with the taste testers here. But I do get in trouble from retro daddy because I start making all the christmas goodies too early for him. I remind him that it’s not my fault if he keeps eating them!

I’ve always seen these little puddings in magazines and they look so cute and I decided it’s time to make my own. And they are so easy I’m wondering why I haven’t made them before. I’ll definitely be doing these every year. It’s up to you whether you want to cover them in dark chocolate. I like them either way and now have a huge batch in my fridge. They’d be so cute to giveaway too.

Give these a go and tell me what you think! Or maybe you already make these and have a few variations you’d love to show! Let me know, I’d love to hear from you!

5.0 from 1 reviews
little christmas puddings
 
Prep time
Total time
 
perfect to give away as a little present - if you can bear to part with them.
Recipe type: Baking
Serves: 24
What you'll need
  • 1 Christmas pudding (about 700grams)
  • a good splosh of brandy/whisky (optional)
  • 200g dark chocolate, melted (optional)
  • 150g white chocolate, melted
  • small bag of glace cherries (red and green)
Instructions
  1. Break up the fruit pudding in a large bowl and add a good splosh of brandy or a spirit. This is optional..
  2. With damp hands roll about a tablespoonful of mixture into a ball and place on a lined baking tray or large plate.
  3. Pop in freezer for about 30 minutes until firm.
  4. Meanwhile cut your cherries into small pieces and assemble them on a plate to look like holly.
  5. If you'd like your puddings covered in dark chocolate then melt in the microwave. I pop mine in a big glass bowl and put it on medium for 2½ minutes and stir it a few times inbetween.
  6. Dip each ball in chocolate and set back on tray/plate. Repeat with all the balls and place back in freezer for another 20 minutes or so.
  7. Melt white chocolate and drizzle a little bit over the top of each ball and top with a tiny bit of red cherry and 2 bits of green cherry.
  8. Refrigerate until needed.


working from home when you have little ones

As a newlywed I’m not quite sure how I thought I was going to be a stay at home mummy and keep up my usual spending and lifestyle. I don’t know where the money tree was supposed to be or why it hadn’t occurred to me that times were going to be tighter. But reality set in when Keira was a few months old. We had a mortgage on our new house, a new baby, I wasn’t bringing in any money and even just shopping for clothes and things at big w and target was costing us money. I learnt pretty early on that if I wanted to spend money and have my crafts then I needed to bring some money in myself.

So I tried avon – there’s no money in it! I then moved on to tupperware and loved it. I’m a huge tupperholic (yes, there is a name for us) and it was great to be bringing money in although husbands don’t love the plastic that invades your house. But for me it was hard to try to do parties and attend the weekly sales meetings with a baby and a husband who was late home or travelling overseas. But I enjoyed it while it lasted and my mum was helping me out behind the scenes. Doing the tupperware gave me the confidence to set up an online store and give it a go. We went to japan with a big empty suitcase and came home with $1000 worth of fabric. And that was how I started my first online store.

I ran the store for a few years and loved it but also hated it at times. Customer service is hard work. Big online stores have people to do their packaging and posting for them and can post parcels off that night or the next day. Little one woman shops have to do everything for themselves and that means even when you’re absolutely exhausted or had a crazy day or sick kids you still have to get orders out in the mail. It was hard work but it was fun at the same time. I made the most beautiful friends and customers and I did love having all of that gorgeous fabric in my house. I reluctantly closed the store for good last year but feel very lucky to be working with my blog and just loving what I do.

And you don’t need to have a big business mind to be bringing in some money to the household budget! Making and selling things to friends, minding other little ones while you are at home, having a market stall (there are so many great little markets now popping up), selling new or second hand things online, doing party plan on weekends or like me using my blog and working online.

And it kind of strikes me as funny that I’ve never been as busy working as I am now and I’ve never had this many little ones to look after! But working from home is just a dream come true if you can do it and bring some money in. But I’m always clear to point out that you must never forget the reason you are home!!!!! Whatever happens I make sure my little ones know that I’m here for them and that they come first. I’ve turned down trips and I hardly attend any PR events because they are all weekdays when I’m busy on the homefront.

and so here are my top tips for working from home:

– make a list of jobs that you HAVE to get done each day/that week so you can prioritise and not forget anything. Include the personal/family jobs in the list too. Nothing like the feeling of crossing things off a list.

– I don’t do phone calls! Unless you are my grandma or my nana. I do email and text msgs and will answer the phone but I’m not a phone call maker. I never have been. Anyone who has called me will know there is no peace and quiet in this house. And also phone calls can tend to go on a bit too long. I’m a girl, I like to talk. If I have to do a call then I schedule it for the day we have our nanny in so I can be guaranteed a little peace and quiet. I don’t know what it is with little people but as soon as you are on that phone they need something or decide to do something they shouldn’t do.

– if you’re really struggling with time and getting things done then get someone in to help you – whether it’s a student or friend to help you with your business for a few hours or giving you an extra pair of hands on the homefront. If you are making some money then using a bit of that money to get some help could mean you’re in business for longer and a little less stressed out. Or pay them in product!

– when you have deadlines take your laptop to the playroom and outside. I am pretty lucky that having so many little ones means they all play together. This afternoon a littlest pet shop jigsaw and pretending we had a fairy cupcake shop had everyone involved and let me catch up on emails and get some washing done and out on the line.

– don’t let your inbox get out of control. But I don’t know the solution to this because I have over 12,000 emails in mine but I’m getting better at deleting as I go and putting things into folders. It’s just there is a lot of history in my inbox. If you’ve got a secret for a fabulous email inbox then please let me know.

– school pick up is a great time to check emails and msgs and get on your facebook page. I can have up to 3 of the little ones asleep in the back of the van and it’s a good time to check emails and msgs. I like to get to school early for a good park so it’s also a great time to grab a bit of knitting.

– think about which social media is best for you and your work. I was so reluctant to join instagram because I was a little maxxed out in the social media department. I love facebook because my readers are all there, twitter moves too fast and sucks me in and is not necessarily productive so I’m not on there much, pinterest is fun and is great for feeding time or when I’m a bit bored, instagram is how I record my day to day stuff……..and I hang out where my readers are.

 – make sure you have lots of times where the computer and phone are switched off! For me this is my baking time, my craft time, my tv time and my taking the little ones out and about. This is us this morning trying to water the garden – we all got wet but had fun while doing a job on my list!

– if you can’t get much done during the day then use your night times productively. I am a night owl which is good and bad….I tend to write most of my blog posts at night, do the photos in the day, team them together, check and double check them and publish either super early in the morning or later in the day. The bad of working at night is that I can feel myself drifting off to sleep while sitting upright with the laptop.

– oh and work on your eyes in the back of your head! Elodie has discovered climbing on to everything and climbing up the stairs faster than I can say ‘where is elodie!’ So make sure you can see everyone and everyone can see you. If I want to sit and do an hours work during the daytime I get snacks out, drink bottles ready, toys out and sit nearby. Everyone can see everyone and I can sit for a while. I love that emerson naps in the daytime.

– Our laundry is next to the downstairs bathroom so every time I go to the bathroom I chuck a load of washing in or fill up the basket. I put the basket next to the door and get it out and take little people outside for a good run around.

– remember you’re not perfect at everything! Oh boy, the pressure we put on ourselves! Lose weight, look good, be fit, have a clean and perfect house, have your kids in 50 million after school activities, help out at school, work from home, cook all your meals from scratch……….who can be perfect at everything! Work out your priorities – clearly exercise is not one of mine but trying to eat right is so I might not be exercising but I am trying to eat right and that makes me feel better. I tidy after dinner or bath time and then again before bed. Not much point in tidying too much before little people have finished playing…..

– don’t overcommit! this is a hard one but know your limits and your workload. Keeping a good calender of what you have on – again both workwise and personally for the family means you can see what is coming up and whether you can take on more or not.

– and lastly always have a good supply of snacks stashed away. Unfortunately there is no vending machine in the home office so I like to know that when deadlines are looming or I’m having a crazier than crazy day that I can find a bit of chocolate in my pantry.

And I’d love to hear if you’re working from home or have any top tips to add. Or maybe you have a question? Fire away………………

p.s my last market is next Saturday 17th November at Leichardt Town Hall from 9am -1pm. I’m clearing all stock out including some lovely new stuff so I can makeover my craft room in time for Christmas. www.mathildasmarket.com.au Come on down and say hi! I love a chat!

mummies, get in front of the camera

One of the things that I do as much as possible is get family photos taken…………..with me in them! If I look back through photos when keira or the twins were babies it’s really hard to find any photos with me in them.  That makes me a little bit sad now. I just was so busy taking the photos or didn’t think I looked good enough to be in them because of my weight. How ridiculous is that! I used to take photos from the neck down or hide behind my craft project. It only takes a minute to ask someone to take a quick picture with you in it but it’s so worth it.

And when you have a blog you can be so self conscious about yourself and putting photos of yourself out there but you have to! People want to see who is behind the camera and the blog! It all gets a bit boring if you’re just behind the words and pictures and not in them! This blog isn’t just about my little ones or my craft or my green carpet or what came out of my oven, it’s about ME!

It does take a bit of courage to get started. I know! I’ve been there! But once you’ve started there is no turning back. You’ll be taking pictures of yourself, passing your camera to other people and sharing those pics on your blog. Here I am this afternoon, I’d had an absolutely crazy day, 4 hours sleep the night before, no make up, my hair had been in this bun since it was wet this morning, I’d just done school pick up and I was enjoying some ice-cream for afternoon tea.  But one day when I’m old and wrinkly and crinkly I’ll want to look back and see how I looked and remember what my life was like…….

And I’ll think what was I so worried about! So mummies get out from behind the camera, get in front of it, hug your little ones, strike a pose, show off your latest outfit, your hairstyle, hold up your latest craft project or wear it, don’t worry about makeup or losing a few kilos or any of that. Just start the habit now………………you’ll be wondering why you didn’t do it earlier. I do.

do you have a family budget?

A couple of days ago retro daddy came home and said words that would strike fear into any lady who loves to shop – ‘can we sit down and go over our expenses. I just want to see where all our money is going’………………………… I managed a little half hearted ‘ok’. It’s not the first time he’s said this and it won’t be the last. Retro daddy grew up as one of 7 children with a banker for a father. They ran a tight ship. I was a banker and an accountant and we have a family of 7 but I do not run a tight ship in the money department. But I love that I’m married to retro daddy the saver.


The reality of running a household is that there are always expenses and money going out the door. Someone needs new shoes or a present or it’s their birthday or something has broken at home. I do always shop around for the best price and there have been times when I’ve sat down and written a budget but it hasn’t lasted long. I love to shop. I always have. And now that I’m bringing money into the house I like to treat myself. To nice things.

And I often get the question how do you afford a large family these days. And I won’t lie. There are times that we’ve really struggled and haven’t had much. Retro daddy almost needed to go for a run and let off steam when the electricity bill arrived. And I don’t really blog about the family budget because it’s not that exciting but I thought I’d see if my readers out there are budgeters or not. Keep retro daddy happy and all of that. Maybe if I blog about budgeting he’ll be happy with me and won’t actually make me sit down and do one!

retro daddy the budget man

So do you budget? Crafters, do you have a craft budget? Shoppers, do you have a clothes budget? Or are you married to someone like retro daddy. I know some ladies out there are the ones who control the finances and run a tight ship. I need to take a bit of your advice, I think.  Talk to me!

it’s a baptism not a wedding!

This has been a crazy week with sponsored posts due, a photoshoot for the twins, a baptism to organise and just my busy day to day life going on. I fell asleep on the couch last night at 8.30pm with elodie and thankfully retro daddy got everyone else to sleep. Elodie slept till 8 this morning so I’d say she’s just as tired being with her busy mummy everyday.

Organising the baptism has felt like I’m organising a wedding. With Elodie’s baptism I learnt to outsource as much as I can but rest assured it still means lots of work. Order the cake, pay the caterer (we’re only doing sandwiches and a few little finger foods), confirm with the church, get my hair done, make sure the gown is ready (I pulled it out of a box on monday and had it soaking in napisan for a day), check the gown fits (it’s a snug fit on mr emerson), order the candle from the nuns and make sure it gets here in time, find some shoes to match my new dress and order them online because david jones has sold out of all small sizes, order a white tablecloth and hope it arrives in time……..

today I need to clean up, write a shopping list for saturday, do a time plan for the day, return Tillie’s dress to country road which arrived with stains on it from the dye they’ve used……………And on sunday afternoon I’m going to put my feet up and rest……..and maybe be a little sad that the last of my babies has been baptised. But I do have first holy communions to look forward to. Plenty more sacraments ahead of us.

These are all pics from Elodie’s baptism

Let’s Get Maybelle to the Ellen Show Auction

I love my crafty blogging friends in Australia and I love how many of them are coming together with local businesses to help a beautiful girl’s wish come true. I’ve shared Bianca’s story on my blog before (you can read it here) and when her gorgeous Maybelle decided she wanted to go to the Ellen show everyone decided we were going to make it happen.

And so at 9am this coming Monday (5th November) the facebook auction will start with some gorgeous items up for auction including beautiful quilts by some of my favourite quilting bloggers – Rita of Red Pepper Quilts ring a bell? She has a gorgeous quilt up for grabs here and I have my eye on Andi’s quilt too. You’ll find my little donation here.

To be a part of the auction fun be sure to go and like the page here

To donate something to the auction – and you better be quick – go here

And to follow the action on getting Maybelle to the Ellen show go here