knitting a kina

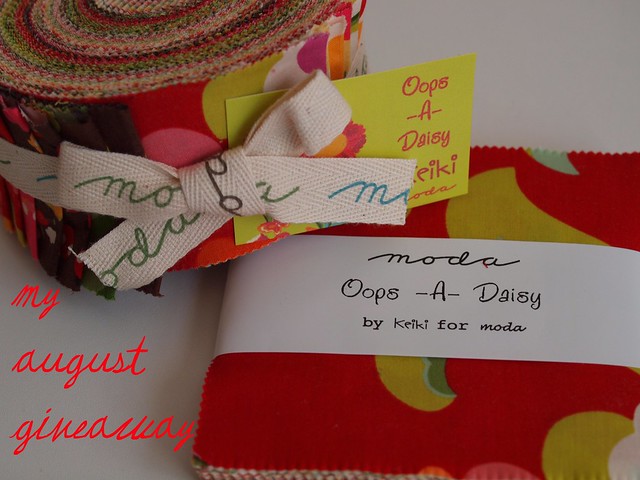
You can purchase the baby sized pattern here, the kids size here and the ladies is available here. The free doll pattern is available here.
Why finish the 3 other projects in your knitting basket when you can start a new project! The story of my knitting life. I couldn’t resist trying out the millamia yarn that I bought from Suzy Hausfrau – thanks Suzy for my voucher. I think I’ll be back for more millamia. It has a real spring to it and knits up perfectly. No splitting and it reminds me so much of Debbie Bliss baby cashmerino. I know I bang on about how good Bendigo is but it’s also nice to use something a little more luxurious for baby projects.
new project
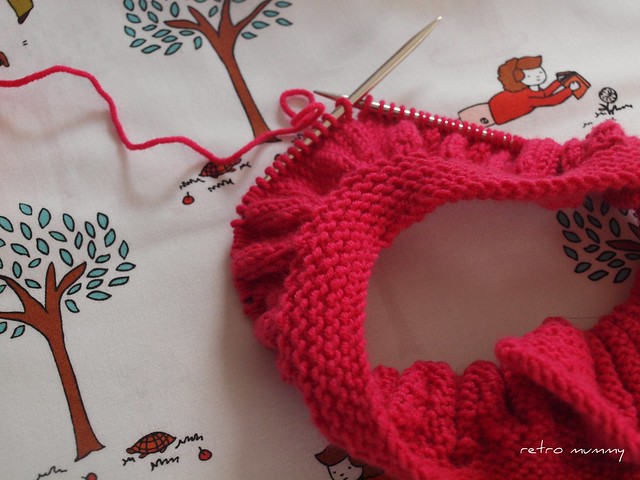
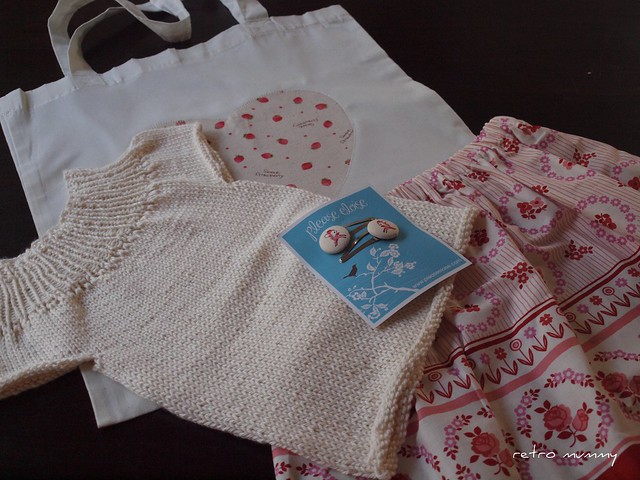
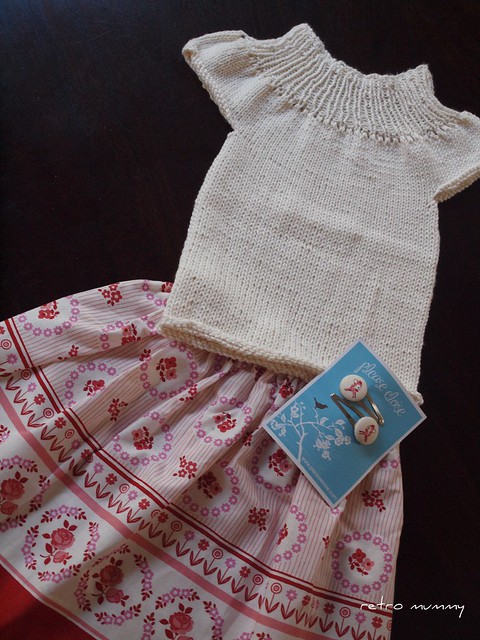
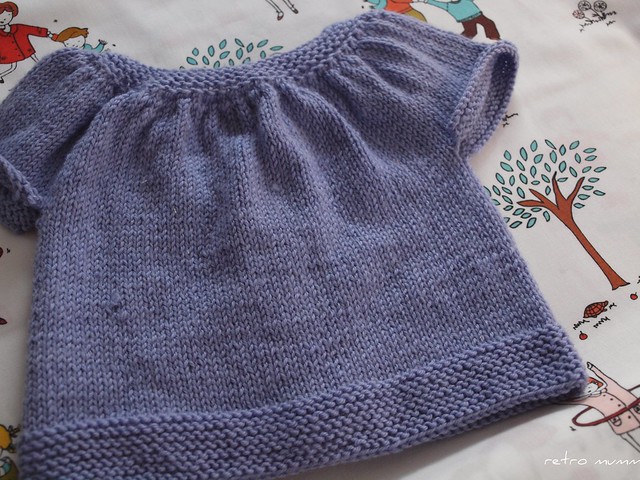
I’m knitting the Kina on 3.5mm’s and it’s knitting up beautifully. I’m very proud of my neat edge and cast on with a 3mm. I’m actually making this for Elodie rather than the baby Kina – why? Because I couldn’t find my baby kina pattern but I’m going to tell you that I wanted to make the larger size because then it doesn’t sound like my craft room is totally disorganised and I can’t find anything.  Thankfully Elodie is growing fast so it’s a good excuse.
baby kina
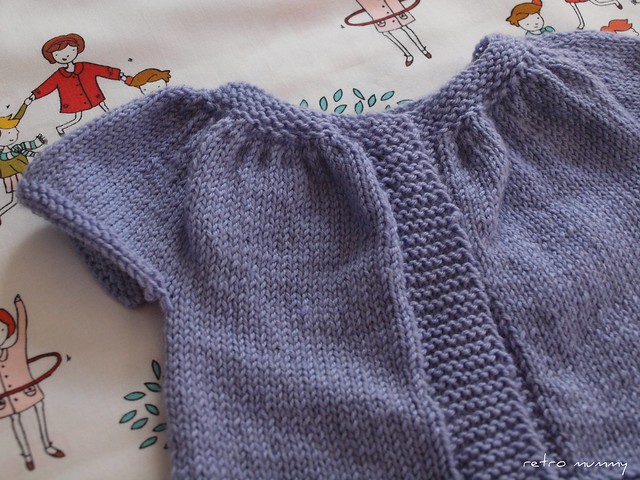
And that reminds me! I don’t think I ever showed you the finished Baby Kina which is super cute! I knit this in Bendigo Luxury 4ply and it’s so soft and sweet. Unfortunately I didn’t have it ready for Elodie….and it’s still not finished or had it’s buttons sewn on yet. But thankfully it’s always nice to have a few baby projects stashed away to give as presents.
one I made earlier
And just a little tip, I know it can be sometimes daunting substituting wool when you’re a beginner knitter so I thought I’d share what I do on ravelry. So you’re going to need to join Ravelry if you’re not already on there. There are tabs along the top of the page for patterns, yarn, forums etc. So if I know the pattern I’m after – let’s say Kina then I search Kina within patterns and then click on the specific pattern. Now you have a pattern page and over on the right there is a box that says ‘About this pattern’ and it will have the number of projects that have been knitted for the pattern. Click on the number and it will bring up pages and pages of Kina projects and what yarn and needle size has been used. To narrow it down you can search for yarns you like to use like Bendigo, patons etc by using the search button at the top of the screen.  I hope that makes sense and just ask! It’s a great time saver and way to find inspiration! If you ever have a question about my knitting or a project just ask…always happy to help!

choc chip, coconut and raisin cookies

I woke up this morning and knew it was going to be a baking day today. I knew we’d eaten the last of the biscuits the night before, I knew we had half a bag of white choc chips in the pantry and I also knew that there wasn’t much to snack on. To get me through the cleaning and major decluttering that is still going on here. So I took a recipe from CWA classics and using what I had turned it into the most delicious cookie ever.

cookies before

Of course I also used my thermomix. I love to do any cookie or cake in the thermomix because I turn my raw sugar into caster sugar as a first step and go from there. These cookies remind me of ones my mum used to make when I was in primary school – maybe even kindergarten. That makes these extra special.

cookies hot out of the oven

125g butter, room temperature
1/3 cup caster sugar
1/2 cup brown sugar
1 egg
1 cup self raising flour
1/2 cup choc chips (I used white)
1 cup coconut (shredded or desicated)
1/2 cup raisins (or sultanas or any other dried fruit chopped up)

Cream butter and sugars until light and fluffy. I do this either in my thermomix for 1-2 minutes on speed 3 or in my kitchen aid. Add in egg and mix gently together until combined. I did this for 15 seconds speed 3 in the thermomix. Add in remaining ingredients and combine well so everything is evenly distributed. I did about 30 seconds on speed 3. Roll into small balls and flatten. Leave enough room for your cookies to spread. Bake in preheated oven at 180 degrees for 15 minutes or until they are looking golden. Now you’ll need to leave these to cool as they are too soft to take off the baking tray so I just lift my paper off my baking tray and put that on the cooling rack while the next tray goes in the oven. You should get 3-4 trays of cookies from one batch.

Enjoy! I challenge you not to go back for more. What am I talking about? Go crazy! I did! And you could play around with the ingredients too like white chocolate, macadamia and craisins or how about dark chocolate, date and pecans! Somebody stop me………..

Always check the back of your work!

Golden rule of craft – check the back of your work. And keep checking it. Something I obviously forgot earlier in the week when I was doing a spot of free motion while Elodie was napping. I was off on my merry way, la de da. I had checked my tension and everything before I started, then I changed bobbins and threaded up my machine again and off I went again…….everything looked pretty on the front, a couple of loose stitches………………..
front looks ok

and then I turned it over. One big almighty MESS! Oh man! The frustration! I rethreaded the machine top and bottom and checked my feed dogs were lowered and was off again with no problems. So there you go. I thought it would make a funny blog post to show that I am human. I make mistakes. I have an unpicker and I’m not afraid to use it! The quilt is just a play quilt for the kids and to get me back into free motion after too long a break from my machine. The range is Oops a Daisy and really fun for kids!

don't do this!

p.s. if you missed the excitement last night on Facebook, well I’ve started to list a few things on ebay. My craft room is being halved when the builders come in to knock down walls and put the kitchen out the back. More listings will be up next Saturday night 9pm but check out my machine and gocco!  All listings are here and with 18 people watching my sewing machine, retro daddy is very happy that I am finally selling things I’ve promised a long time ago!

The Help – a review and giveaway

Sponsored by Nuffnang

Some movies stay with you for a long time after you leave the cinema. The Help is now one of those movies and right up there with my all time favourites. I was lucky enough to attend a pre-screening followed by a High Tea last weekend. You can read about the High Tea here. And let me tell you that I was mesmorised the entire movie. In fact I realised an hour in that I hadn’t even shifted in my seat. That never happens. This is a movie that just touches your heart and emotions. And I was getting teary in the first 5 minutes. Then realised I didn’t bring any tissues. Uh oh. Bring your tissues, ladies.

Skeeter, Minny and Aibilene
The Help is based on the best selling novel of the same name. Set in the 1960’s in Jackson, Missisippi it centres around three very different women. Skeeter, the recent college graduate who comes home to Jackson and starts work at the local paper with higher aspirations. She’s not like her housewife friends who are married and starting families. Aibilene is a housemaid who has raised 17 children in her career and focuses on giving the children love and raising them to be strong and happy. And Minny who will make you laugh with her antics and good cooking. Oh her fried chicken looks so good and does she love her crisco.
Minny &  Celia with the Crisco

There are so many things to love about this movie. The strong women, the challenges they each faced, the relationships, the funny moments, the brilliant acting, the history, the food and the mothers and daughters. I felt as if I was living in the movie I was so mesmorised by it. And of course being retro mummy, I was in love with the clothes. The way those ladies pulled off their high waisted capri’s and little flats, stunning. Oh and their perfect hair!  

Aibilene and the ladies 
And being set in the deep south means that food plays an important part of these ladies lives. I was getting hungry with all the pies being made and handed around. And then there was the fried chicken. Oh the fried chicken. I may or may not have typed ‘best southern fried chicken recipe’ into google when I got home. Won’t retro daddy be getting lucky with some southern style fried chicken for dinner!!! In fact when the movie is out on DVD I think I’ll have a girl’s night in with a southern inspired dinner to match the movie. I’ll probably have seen the movie 3 times at the cinema by then.

Now I could go on and on about this movie  but I won’t say anymore so that you can enjoy it. And if you have been living under a rock and missed the trailer, then here it is:

And now the best bit. I have 3 prize packs to giveaway! Each winner will receive a double pass to see The Help and a copy of the novel too. I’m a little jealous since I haven’t read the book yet. And since this movie is all about inspiring and courageous woman, just tell me who is inspiring and courageous in your life? This giveaway is for my Australian readers only and please don’t forget to include your email address in your answer so I can email the winner. Full T&C are available here .

And if you don’t win then you will want to see this movie. I know it’s going to become an all time favourite for lots of women everywhere.

What is Brandavino?

That is what I typed into google last night………I was making a chocolate cake that called for 1/2 cup of brandavino. Now I pride myself on my food knowledge. So it is a rare occassion that an ingredient comes up that leaves me stumped. Until Brandavino. Google kept giving me references to the 70’s and teenagers getting drunk on it. But that doesn’t help you when you’re trying to find a substitute to put in a chocolate cake.
But it turns out that Brandavino is a fortified wine so you could substitute with sherry, brandy, port or marsala. I went with sherry. And there you have it…..the definition of Brandavino that only my facebook and twitter ladies could tell me. And the cake? Delicious. Recipe coming later today with a review of the latest CWA cookbook – my new bible. 

a handmade birthday

I think nothing is nicer than a handmade birthday present. I put this little gift together for my niece/god daughter’s birthday and am feeling very proud of myself. I take birthdays very seriously and think this will make a lovely outfit. If there is one thing I’ve learnt since having 4 children – it’s that buying or making the whole outfit means it will always be worn from the day it is received.

handmade birthday present
This is a simple elastic waisted skirt from 1/2 a metre of Kokka fabric – and before you ask me this was from the stash and a couple of years ago! A little knitted tee from this pattern knit in Bendigo 8 ply cotton. The pattern is from etsy here. The Bendigo cotton will stretch over time but I hear that you can pop it in the dryer to get back some shape in it. I kind of like that it grows so you get some wear out of it. I also popped in some cute bambi hairclips from Please Eloise and an applique library bag (thanks to Posie who told me about the bags from Lincraft).

the outfit
Done and in the post before the birthday. Now that is what I call efficient! If you struggle to find the time to make presents when a birthday arrives then my little trick is to make a few at a time and then put them away. It’s the way I do it but most importantly – remember where you put them! I have so many safe places I forget where things are. 
quick applique bag
 
Do you love a well thought handmade present too?

Valencia Orange Cake from Little Kitchen Around the World

Ok now you might have noticed that once I get a cookbook I get a little obsessed by it. What? Me? Obsessed? Yes. Especially the biscuit and cake section of any book. I will make a tonne of recipes all in one go then put it on the shelf and use later. I’ve been a bit like that with Little Kitchen Around the World. It’s due out tomorrow (1 September) and is definitely one to look out for. The Valencia Orange Cake recipe was a huge hit here. It is essentially an orange and almond cake and you can make it gluten free if you wish just by leaving out the flour.

new book

I’d always wanted to make one as I was curious how it would taste considering you use the whole orange. Skin and all. And I’ve got to say delicious! Beautiful in colour and texture and I kept it in the fridge for a couple of days as we ate our way through it. Retro daddy and Finn were also huge fans and they’re not really into the sweet stuff.

orange and almond cake

Hate to say it but the thermomix made light work of the cake and made the almond meal and entire cake. You can even boil your oranges in the bowl if you want but I wanted to follow the recipe from the book and then convert to the thermomix.  Definitely give this a go. Making your own almond meal makes the cake more budget friendly and the accountant in me noticed that it was $10/kg cheaper for whole almonds compared to the almond meal. And I hope you store your nuts and almond meal in your freezer – it makes them last longer. Great tip I picked up from cooking schoool many, many years ago.

Valencia Orange Cake from Little Kitchen Around the World

2-3 large oranges (approx. 650g in total) and organic if you can as you eat the skin

1 Tsp butter for greasing

6 eggs

1 1/2 cups caster sugar

1 1/2 tsp baking powder

2 cups almond meal

3/4 self raising flour

1 1/2 Tbsp icing sugar (to dust over finished cake)

orange cake before

The first step is to place your oranges in a saucepan with enough boiling water to cover them. Simmer for 45 minutes then remove from the water and leave to cool. I actually did this step in the morning and came back to them later. Cut off the little bit of stem of your orange and then slice each orange down the middle and remove the white pith and pips. Now process if your food processor (or thermomix for 1 minutes on speed 5) until smooth and there are no lumps in there.

If you want to make your own almond meal then I placed about 400g of whole almonds in the thermomix bowl and processed by pressing the turbo button a couple of times until I had the right consistency. This will make more than 2 cups but just freeze the rest in a ziplock bag or airtight container. If you buy your almond meal your cake won’t have the brown specks I have from the almond skins and will look more like the picture in the book.

orange cake

Preheat your oven to 180 degrees. Now whisk your eggs and sugar for 3 minutes until light and creamy. I did 2 minutes in the Thermomix on speed 4. Add baking powder, almond meal, flour and stir until all combined. In the Thermomix I did this for 30 seconds on speed 3. Now add your orange mixture and mix well.  20 seconds on speed 4 in the Thermomix for me.

Pour into greased and lined round cake tin and bake on middle shelf of oven for about 40 minutes or until a knife comes out clean. Remove from oven and leave cake in tin to cool on wire rack for 10 minutes. Remove cake from tin and leave to cool completely. Of course I didn’t do that beccause I just wanted to get straight in there and eat that delicious cake so I left it to cool 5 minutes then removed the tin and started eating. Serve cake with the icing sugar sifted over the top and a big dollop of whipped cream. I’d go the King Island Cream to really blow your diet out of the water!

Vera Bradley – why didn’t you tell me?

Honestly! Have I been living under a rock? Have you heard of Vera Bradley? Then why didn’t you tell me! How did I not know about these amazing bags and accessories before. A lovely new customer to my stall on Saturday came with the most gorgeous handbag. I asked here did she make it and she told me no it’s vera bradley. She then showed me a few more accessories from her bag and was carrying a business card of a seller in the states who ships to australia. My kind of lady. Thank you.

I mean let’s look at this lunch bag. Suddenly taking lunch to the park while the little ones play just got a whole lot more fashionable.  I can’t believe this is an insulated lunch bag!
Or how about the nappy bag in ‘happy snails’.

I’m not going to reveal how much time I’ve spent at her lovely website looking at all the gorgeous bags. I haven’t decided what I’m going to get but am definitely putting some things on my Christmas list. And for a few special relatives too. And just in case you were wondering, this company ships internationally just in case you want to make a note of it. Just in case. I’m not saying you have to. So did you already know about Vera Bradley?
All images from here

recovering from a market

Sorry I didn’t blog yesterday, I’m still recovering from Saturday. I usually bounce back pretty quickly after a market but Saturday took it out of me. My legs ached and I felt like I’d run a huge race. Luckily, I got to unwind a little yesterday when I went to see The Help (full review coming soon) and have High Tea afterwards. It was very civilised and a lovely way to spend a Sunday morning. Except the getting up at 6.30am part.

Anyway, before the market I had a great idea to whip up a quick quilt using 2 packs of charm squares and bring it with me. Um, I got as far as piecing the top. But still. It’s something. Now, normally I would use 1 charm square pack but I am loving the size you get with 2 packs. And the colours – perfect. The range is Summer House by Lily Ashbury for Moda.

This will be the quilt that will hang on the couches once our new kitchen is built out the back. I think we’ll be spending all our time out there with a new kitchen and family room overlooking the pool. Bring on summer. Now to quilt it. I have a few packs of charm squares that I’ll list for sale later in the week with market stock but unfortunately the range has sold out at the supplier so I’m saving more packs for my Christmas markets.

p.s I’ll be at Mathilda’s Christmas Market this year in Melbourne and Sydney!

I love a busy market

I may not have an online store anymore but can I just say that I love markets! Especially when  you’re sitting at home in your pj’s at 4pm with your feet up, coffee next to you and reflecting on the day. I don’t love markets when I have to set my alarm for 5am but once I’m there – I’m ready for action. And what a day of action I had today. You never know how a market will go and especially at a new venue but today was non stop busy. Crazy busy. My table kept moving busy.
before
I probably could have done without retro daddy declaring he had done his back in by lifting all my tubs into the car. BEFORE he had unloaded the car for me at the market. He’s now taking a nap in bed and taking some voltarin leaving me to unload the car. When I get around to it. But I don’t mind. I had my best market and so many lovely ladies popped along today. Old customers, new customers, blog readers, people just coming to the market for the first time. It’s so nice when you see a familiar face at a market and someone to chat too as well as new people finding my fabrics.
neat and tidy
Markets can be funny. The first through the door tend to do a lap before spending any money so really the time to come to my stall was the first half hour when it was very quiet. After that it was all on with those $3 fat quarters flying out of the baskets. And it didn’t stop! Thank you to Sonia who got me a coke to keep me going. And to Maxabella and Jenny who helped me move my table so I could squeeze in behind it and also tidied my baskets as they went along. Thank you. And to my lovely neighbour, Please Eloise for the delicious pastry which became a late lunch in the car. Thank you. Phew. It was a busy day

after

The good news for retro dadddy is that we sold A LOT of fat quarters (which of course means I can order more). The good news for my readers who live all over australia is that I still have baskets with fat quarters and some special ones tucked away for you. I just need a couple of days to recover, catch up and get on top of the things that have deadlines. I hope to have some great bundles listed for you on ebay and craftumi mid next week and I’ll announce when they’ll be up a day before so no one misses out.

Thank you Mathilda’s for a great market. And thank you again to everyone who popped along or wished me luck. I have a few months to recover before my next market and the good news is that I can buy some more fabrics in time for Christmas.  

little kitchen around the world

I love cookbooks and have quite the little library going on at our house. Amongst all the books are a couple of kids ones which keira loves to flick through. So I jumped at the chance to review a new kids cooking book that is being released next month, Little Kitchen Around the World by Sabrina Parrini. And it’s easy to love this book.

new book

The recipes are a little different to the usual ham and pineapple pizza or chicken nuggets that you tend to  find in kids cookbooks. Chai cupcakes, pad thai, moussaka, lemon biscotti, valencia cake or sticky lime cupcakes anyone? Not your usual recipes for little people to cook that’s for sure. And the good news is my kids have loved everything I’ve made so far from this book. This book is easy to read, has lots of funky photos and food styling and recipes that are a little different but not too out there that the little ones won’t want to make and eat.

love the references

The page layout is easy to read, recipes are categorised by level of difficulty with cute little faces and show the country where the recipe originated and how many serves each recipe makes. I also like that the steps are detailed and all equipment that is required like baking tray etc are listed underneath the ingredients so that the kids can get out everything they need ahead of time. Whether they clean up the chaos afterwards and put everything back is another thing. Let’s not go there. Whilst the book is targeted at 8-12 year olds,  Keira who is 5 was all over this book reading out the recipes and picking what she was going to make. We settled on the lemon biscotti and orange cake.

preparing to bake!

I loved the recipe so much I asked if I could share it so here is the lemon biscotti recipe. Trust me you won’t be disappointed. Even Finn who isn’t into cookies or cake ate 4 in a row and kept helping himself from the tray. And because I love my thermomix so much I’ve also converted it to the thermomix for you too.

more cookies

1 Tbsp butter for greasing

130g unsalted butter

2 1/2 cups self raising flour

150g sour cream

1 egg

1 egg yolk

1 tsp grated lemon zest

1 cup caster sugar

1 tsp vanilla extract

1/4 tsp bicarb soda

1/2 cup icing sugar

Grease baking trays with the tablespoon of butter using some scrunched up baking paper. Put the unsalted butter in a small saucepan and melt over medium heat. Set aside. Combine the remaining ingredients except the icing sugar in a large mixing bowl then pour in the butter. Mix well with a wooden spoon – you should get a firm dough. **Cover the bowl with plastic wrap and refrigerate for at least 20 minutes. Preheat your oven to 200 degrees.

Remove the dough from the fridge and roll tablespoonfulls into balls. When you have used all of the dough, spread icing sugar on a large plate and roll the balls, a few at a time in the sugar so generously coated. Place 5cm apart on baking trays.

Bake biscuits on middle and bottom shelves of oven for 8-10 minutes or unitl just lightly golden. Carefully remove trays from the oven using oven mitts. Cool for a couple of minutes then remove the biscuits from the trays with an egg flip and palce them on wire racks to cool completely. Or eat them straight out of the oven which is what I did. They are light, ‘lemony’ and beautifully soft the next day. 

lemon biscotti

In the thermomix place the rind of 1/2 a lemon and sugar and process for 10 seconds on speed 9. Set aside. Place butter (cubed) into your TM bowl and melt for 2 minutes on 100 degrees and speed 1. Set aside. Return sugar and lemon mixture to bowl and add in the remaining ingredients except for the icing sugar. Process for 15 seconds on speed 3. Scrape down bowl and process for 30 seconds on closed lid setting and the knead setting. Place in a bowl and refrigerate for at least 20 minutes. Follow from **.

Enjoy! I hope you enjoyed my first ever cookbook review! Thank you Hardie Grant, I had a lot of fun doing it.  I would definitely buy this book as a present or for my own little ones especially if they love cooking and masterchef. Plus you’ll get dinner made for you – just make sure you train them to do the dishes and wipe down benches!

$3 fat quarters

I’m sure that got your attention, which is good because that is how much you’ll pay for any of my fat quarters this Saturday at Mathilda’s Market . All 10 baskets of them. My fabrics are stored where my new kitchen will be in October (yes, I paid the deposit and we’re getting ready to go) so I need to clear out before the builders come in. I spent a good 4 hours tonight cutting and folding and am glad to see the end of a lot of bolts and odds and ends that had been hanging around.

market packed!

There are over 120 stalls this Saturday which is amazing but also a problem because I won’t get any shopping time for myself so might have to do an early whip around the hall before 9am. So if you’re in Sydney and not doing swimming or sport or other children’s events then pop on down for the market – you’ll find me on the far right wall with  my fabrics and a big smile.

my top market stall tips

Oh surprise, surprise – I have a market on Saturday and I still have a mountain of jobs to do before then. Some things will never change. But I love markets and do my best work at the last minute. And it got me thinking that it’s been almost 2 years that I’ve been doing markets and I’ve learnt a thing or two…………so here are my top market tips for those of you starting out or new to it. It’s not the definitive list and I’d love to know your top tips to share too:

ready for market

1. Be organised.

Make a list of everything you need to take on the day and tick off as you pack it. My usual last minute supplies that I need to top up on in the last week are paper bags, price tags and updated price signs.

2. Have plenty of business cards or flyers on hand.

 I learnt early on to skip the fancy business cards for markets and save them for conferences and meetings. I go for vistaprint as I was using a box of pretty glossy moo cards in a morning so I now buy by the 500 or so and it’s much more economical. Make your own flyers on a printer and pop one in each bag too. Cheap and easy.

3. Dress for style and comfort.

Even if you’ve been up late sewing for a week or so layout some clothes that you know you look and feel good in. For me it’s my favourite white shirt, jeans and silver birkenstocks (the comfort part) or a simple dress – you’ll be on your feet all day with no time to sit down but you also are the face of your business and your stall. It’s worth looking nice. Trust me.

4. Smile and talk.

Being a total chatster myself, one of the things I love about a market is all the chatting I get to do. But it can be daunting standing at your stall with strangers walking by – will they stop, will they keep walking, what do you say? My secret is just keep smiling, adjust things, straighten those business cards. When someone comes up to the stall always say hi and I say just let me know if there is anything you’re after! Just remember this is fun. Even if you’re having a crappy day just keep smiling!

keeping things neat and tidy

5. Always bring extra stock.

Whenever I leave a particular fabric at home that will be the one that someone wants. So I always pack an extra container and I might not even get to it but still it’s good to know that extras are there and if I have a great market and am running low on anything I can bring out some extra stock.

6. Don’t forget your float.

The lovely retro daddy goes to the bank the day before my market and gets me $20’s, $10’s, $5’s, $2’s and $1’s. I don’t have a huge float but I do start the day with plenty of $20’s and $10’s as everyone comes in with their $50 notes. Trust me! Bear that in mind when you’re planning your float. While you can never judge how much cash you will need I can guarantee you that you will get plenty of big notes at the start of the day. And don’t do what I did once letting a stallholder buy something small and pay with a $50 before the market started. Just kindly tell them you will set it aside and they can come and purchase it later with something smaller. I’m pretty sure they’re after change for their float.

7. Get yourself a trolley or a big strong person.

Now I am no strong person but I have retro daddy and we have our system down pat – I stay with the kids in the car and he unloads the car doing 3 tubs at a time and emptying the car in no time. He’s such a good helper. If you don’t have your own retro daddy or strong person then get a trolley so you can load up your tubs or stock and do a few in the one trip. Oh it saves the time.

market set up

8. Find an easy to iron tablecloth.

I now use some poly/cotton gingham pieces of fabric for my tablecloths as I can fold them up lightly and they don’t come out of my tubs super creased. It’s a nice look if you’ve ironed or got tidy tablecloths on your tables. The fabric cost me something crazy like $2 a metre from Spotlight so there is no need to spend big.

9. Do a trial run of your table

Especially if you’re having your first stall but be prepared to work with your allocated space. I now have my own trestle table and 2 card tables (a bargain from the hardware store). I wait till I see where my stall allocation is and decide which to bring. I’ve done 2 tables next to each other, an L shape, a horse-shoe…whatever works in the space I have and maximises my stall space whilst still allowing for people to get in and look at my baskets.  Just be prepared to be flexible. I have had some doozies of stall allocations but you know what? I do the same sales whether I’m right at the door or on a far wall squashed in between other sellers.

10. Make sure you have a sign with your business name easily visible.

I don’t have fancy signage for my stall because I keep thinking I’ll do that before my next market and I’ve just never got around to it. And even if you make it yourself (which I’ve done) just make sure that people can see your business name easily as they walk by.

pretty dresses

11. Raid your house for bowls, baskets, cake stands, shelving or whatever you have to display your lovely wares.

You’ll be amazed what you can find in your cupboards and craft room. If all else fails I went to my $2 shop for some fabric lined baskets and bought some cute stacking suitcases on ebay. And just make sure it fits in the car with your stock too.

12. Choose which markets you do carefully.

 I started out with a small baby & kids market thinking I wouldn’t get accepted into Mathilda’s. After a while I got the confidence to apply to Mathilda’s and Handmade in Canberra. Now I receive lovely emails inviting me to lots of different markets and start ups but you need to choose which ones are going to be worthwhile, within a reasonable distance from home, will have the right customers for your goodies and a good flow of customers. You don’t have to say yes to every invite.

cute baskets of cute things

13. Be prepared for a bad day.

Everyone has them. It could be the weather or another big event on the same day. I’ve had them, markets where no one has walked in the door for over an hour or where other stallholders seem to be doing better than me. Sometimes it could be just the market or just the day. If it keeps happening to you then it might be time to get a bit of constructive criticism and see if you’re at the right market, is it your stock, are you pricing properly and other big questions. Whatever happens don’t forget number 4. I’ve seen so many grumpy stallholders whingeing or leaving early but you’ve just got to keep smiling as you never know who might be your next customer.

14. Always chat to your neighbours.

 I always say hi to the stallholders on either side of me. You never know when you’ll need to duck to the toilet or grab a coffee. I’m sure you’d do that anyway!

might as well mention notebook

15. Don’t forget the snackies!

Since I do my stall solo I always pack snacks for myself and it’s always the same – rice crackers, a bag of jelly snakes, a bottle of diet coke (I know, I know, not healthy) and a couple of muesli bars. I leave home at 6.30 and get home after 2 so it’s a long time away from food.

And just have fun, take photos of your stall and remember that it gets easier! It gets so much easier once you’ve got your stock organised and a few markets under your belt!

Quilts for Queensland day debrief

A lot of fun happens when ladies get together for a day…………of craft! You can sit next to someone new and find something to talk about and a new friend is made. There was lots of talking, lots of sewing, lots of quilting and a bit of eating. I arrived with boxes of blocks and by the end of the day we had made 23 quilts, more quilt tops and are well on our way to finishing them up!
start of the day
Such a huge achievment. I had a serious case of the pre-craft day nerves in the morning and retro daddy said to me as he was leaving me at the centre ‘aren’t you worried?’
me ‘about what?’
him ‘that only 2 people are here’.
me ‘no, they’ll come’.
him ‘ok then’….. he also told me to tell the ladies that it’s not about making works of art but getting them done. Wise words from someone who wants the boxes out of our house. And we had 19 ladies join us today (yes 19!!!!!) and we powered through those quilt blocks, baby. Such a great feeling and achievment to come home with 2 boxes of completed quilts.

more of our day
It was such a fun day and we’ll definitely have to bring our machines along for a craft day again soon. I could have kept going for a couple more hours but before long the big gold multivan was out the front of the community centre to bring me home.

busy busy!

And I can’t say thank you enough to my lovely ladies today – and oh boy don’t I wish I took all your names and email addresses and blogs but here goes- Lisa, Lisa Lewis, Nicole H., Jan-Maree who I think I called Di during the day, Sheridan (thanks for the polar fleece!), Sonia, Stacey, Nicole and her mum, Jenny, Bron aka Maxabella, Pat, Sabeena (thanks for the baby cuddles), Jenny, Marisa (did I spell it right?), Hilary, Anne, Denyse (thanks for the cupcakes) and Celia. Couldn’t have done it without you lovely ladies.  Thank you! And if I’ve left you off or made a mistake then tell me – today went like a blur and I’m sure I’ve made a mistake! In fact I guarantee it.

my august giveaway (and winners)

Well today was a bit of a crazy day as Saturdays usually are and I’m baking lunch for our Quilting day and doing the laundry at 11.24pm so it never ends here. And then I realised I was seriously behind in drawing giveaways – but what is new around here. I promise I always do them and there are happy recipients. So first up in my catch up is July’s Little Apples layer cake winner. Random.org tells me the prize goes to entry 58 – Melanie! Woohoo happy quilting, Melanie.  And then there is Violette Field Threads and there were 5 patterns to giveaway – I picked Julie, Amy, Carolyn, Angie Claire and Cath! Drop me an email ladies so Violette Field Threads can email you the pattern.
august giveaway
And here is my August giveaway – love this one! Oops a daisy is a new fabric line out from Moda and I’m giving away a jelly roll and a charm square pack to one lucky reader! Gorgeous. This range is fun, bright and has lots of cute mini gingham which gives it a cute and country feel. Just leave a comment and tell me what you’re going to make with it and I’ll draw a winner the first week of September. And I post worldwide so get thinking and enter.