One of the things that I love about blogging is that you’re always learning. You were thinking one thing was the right way to do it and then you hear something else and realise that you want to change. I was always under the impression of keeping all of your colours and branding the same on your Facebook page. I thought that my timeline cover should be my blog header to keep it all consistent. Well Amy Porterfield, remember I called her Facebook guru and I do like to call it like it is, well she says let your timeline cover describe you. Ohhhhhhhhhhh. And so I realised that having my blog header as my Facebook timeline cover actually doesn’t tell you much about me.

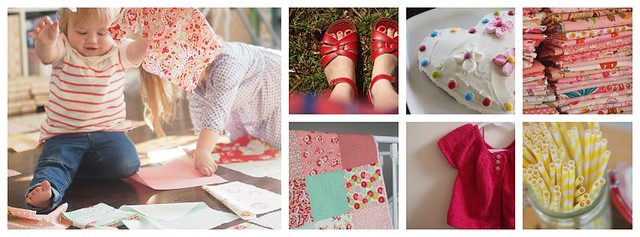
So I went off to PicMonkey and realised (because I was trying to find the right layout of squares) that there is even a template with the exact dimensions you need for a Facebook timeline cover. Woo hoo. So here is how you do it. The first thing I did was go through flickr and my blog and pick a few great photos. Things that I love so cakes, knitting, quilting (not that there is much of that these days but I love it), fabric (plenty of fabric love going on right here at this house) kids (I’ve got plenty), a fun and fresh photo that I took and I saved them to my computer.

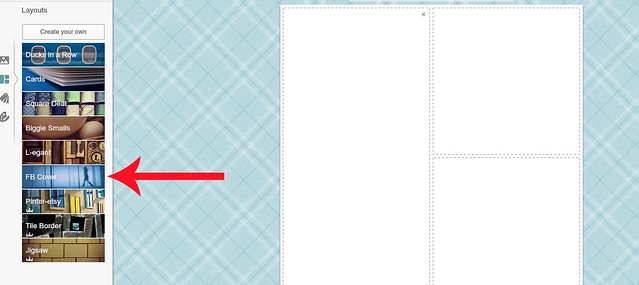
Then I went to PicMonkey which I use for putting text and cute little buttons on photos. Select create a collage and then go over to the left hand side. See that little button FB Cover. How easy is that. How did I not know about this. Crazy.

Ok so you’ve selected that and now you’re going to choose how many tiles you want and that’s up to you! You might want to focus on just a few photos or have a real variety. Just go for it. Up the top of the page you select open for uploading photos and they will appear to the left of the page and you just click and slide over. And if you want to shuffle them around just move them around between the squares.

You can make the white borders smaller by selecting spacing at the top of the left hand column and then save it (up the top of the page). Now if you want to put some text like your blog name or a little byline then you just click edit (it’s just along from Save at the top of the page) and add some text. Save your work to your computer and now you want to head to Facebook. When you click or hover over your timeline it will come up with the little button to Change Cover. So we’re going to click it and upload the collage you’ve just created and saved. Now you are done and can enjoy your new timeline cover.

And that my friends is how I changed my facebook timeline cover yesterday and I love it. It sums up who I am and when people come to my page for the first time they get some fresh photos and can see what I’m all about out. So go forth and make timeline covers………….even if you have a family business go and personalise it and get creative. It’s lots of fun.


That is so beautiful and you all over.
awwww thank you
Corrie:)
thanks I will try that later.
let me know how you go:) look forward to seeing it
Corrie:)
thank you so much for sharing
Happy stitching, P
my pleasure! one thing I also took home from the conference was sharing;) so I’ll be sharing lots
Thanks, will definately try this!
yay! happy to help
Luv it. Can’t wait to try it. Keep safe and enjoy your holiday.
do it! so easy and thank you:)
hi corrie… is there a way to remove ur profile pic using pic monkey as well?? as in you just have the big pic then 4 (or however many you want) little ones with no profile pic??
mmmm I’m not sure! I like it for logo but that sounds like a facebook thing not a picmonkey thing.
Thank you so much! Mr8 does all of the creative stuff on my blog and sometimes it’s not quite how I want it, but you don’t like to correct someone when they are doing you a favour. I really need to learn how to do all of this myself and be more independent don’t I. You make it look so easy. Great pics by the way and definitely you.
it is easy and you can do it! I was trying to find dimensions of the cover then realised on picmonkey it does it all! really easy, go on! you can do it
Thanks for sharing!!
my pleasure! expect more of it
That’s perfect. I was wondering what app this could be done on. The one I had didn’t accommodate it. You are very generous, but we already knew that.
I just changed mine a couple of weeks ago so off I go again. Such fun to include more about who I am too. Not that my very private Facebook page goes out to many people.
Thank you so much.
I feel like such an idiot…..I’ve been using pic monkey for ages and it never dawned on me that FB Cover was facebook!! So thank you!
Great instructions. You’ve encouraged me to try it…thank you!
Thanks for posting this because I was totally spaced out during Amy’s session, trying to keep up with ALL the information! x
I love this. It’s one of the things on my list after the conference and now I won’t have to mess around with what program to use. Thanks!
Bettina
http://www.littleoldsouls.com
Looks great! Makes me a tad sad that I disabled my facebook page!! Will share with some bloggy friends though! Love picmonkey!!
I love PicMonkey! I use it for all my advertising. A crafty friend got me onto it and I think it’s just so brilliant. Why pay big bucks for a graphic artsist when you don’t need to. I’ve even used it to edit my logo. Your post reminded me to update my cover from winter to spring. I love your picture of the sandals and the straws. Great perspective and the colours do blend well together.
Miriam
http://www.petitarmoir.com.au
Great post Corrie thanks! I have shared on my page too xx
How rad was Amy Porterfield?!
I just followed Nikki Parkinson’s (@StylingYou) tweet here and she said that this is what she does to – and since Amy picked Nikki’s FB page as a great example of what to do, I’m going to try implement this now on my page. Thanks for the post!
I’ve been using PicMonkey for over a year now. No complaints here, and I’m just using the free account.
Thanks so much Corrie! And an even bigger thank you for your easy instructions! I have just changed my cover photo now. Oooh I love PicMonkey! Thanks again for sharing this great tip
Hi Corrie, I am a newcomer to your blog but this was a great one to start with! Thanks to your tips I have created a new banner for my blog FB page including photos of all six contributors on Champagne Cartel (well, five of us and a monkey – one blogger is shy). It’s such a nice, personal touch. Thanks for your generosity in sharing this knowledge. The page is here if you want to see my handiwork. https://www.facebook.com/champagnecartelblog
Thanks!
Carolyn
This was a great tutorial Corrie – thanks for sharing!!! I’ve just changed my Facebook header and LOVE IT!!!
Really that’s what i thought too so i left it as my blog header *sigh* Now i can’t wait to change mine . Thanks so much Corrie xxx Yours looks amazing!
I know!!! And I’ve read my notes and it says to change each month!!!!!
Thanks for sharing – I just used your tutorial to create a new blog banner – now I like my blog again!
Thanks so much. I use picmonkey but did not know how to do this. Mine is updated and I love it!
This is awesome. I wonder if I could make a new blog header with this. THanks for sharing. I’m going to try it out right now!
Thanks for the tip! I did mine after reading this post – you can check it out at https://www.facebook.com/RedlandCityLiving
I love this program, for an artistic clutz like me it is magic!
Thanks so much for this tutorial Corrie, it was a great help.
I just launched my new blog on Saturday and needed a way to personalise my facebook page. I’m so happy with the result, here it is https://www.facebook.com/chaidays