Search Results for: pink rainbow cake

How to make a pink rainbow cake!

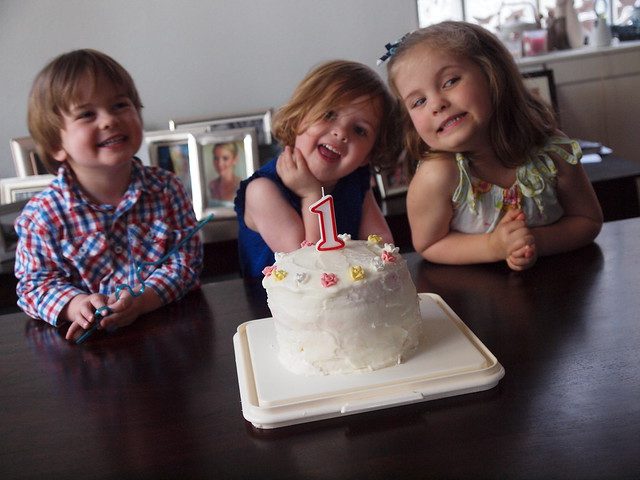
I’ve been getting a few emails and questions about the pink rainbow cake so decided to put all of of the tips and advice in the one place here. Now the first time I made the cake was here and the more improved version which I made for Keira’s birthday was here.

so proud of this cake

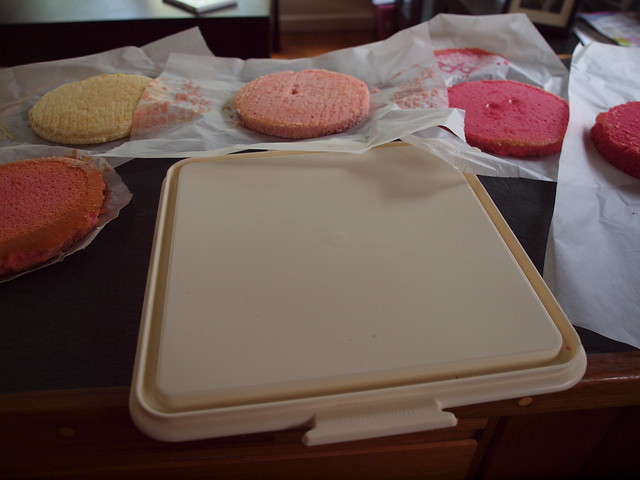
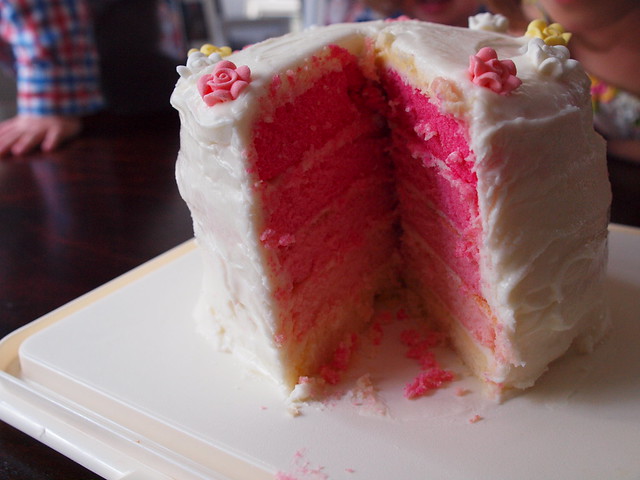
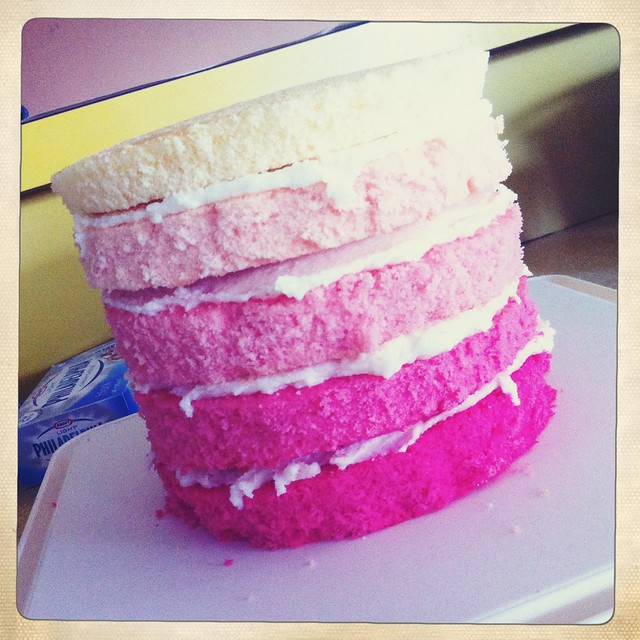
– use 2 butter cake packet mixes and you’ll need 5 bowls of about the same size for your mixture to be divided.

– I use Queen’s food colouring from the supermarket – Rose Pink flavour to be exact

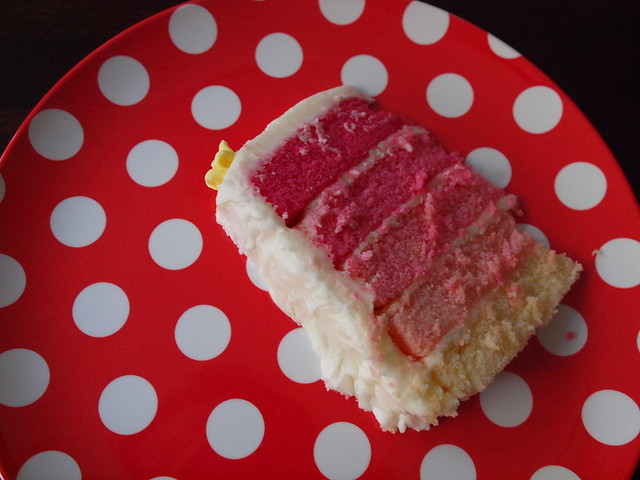
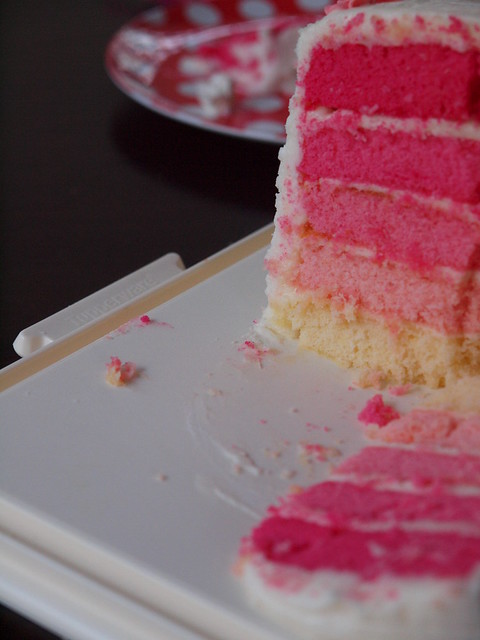
– when colouring your cake mix leave the first bowl plain, add just a teensy bit of pink for a nice pale pink layer. I use a skewer to colour my cake mix to make sure I don’t overdo the pink colouring

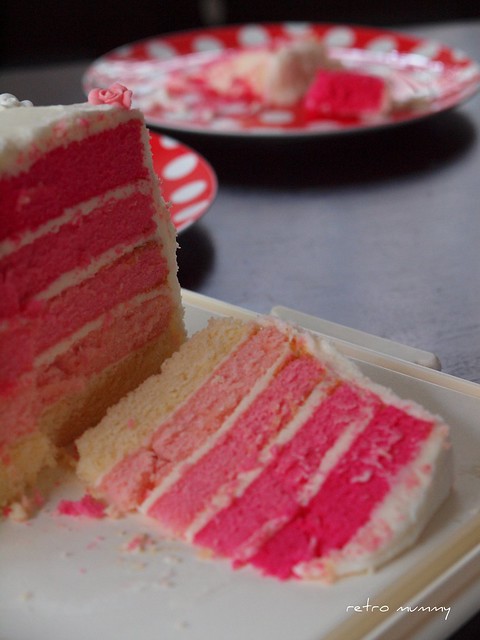
– the last layer of pink cake does need quite a bit of colouring so don’t be scared of it! You want a really hot pink!

Making A Rainbow Cake

– make your cakes the night before to ice the next day and store with layers of baking paper in between. Cool the cakes when they come out of the oven on paper overyour cooling rack too to prevent lines on your cakes.

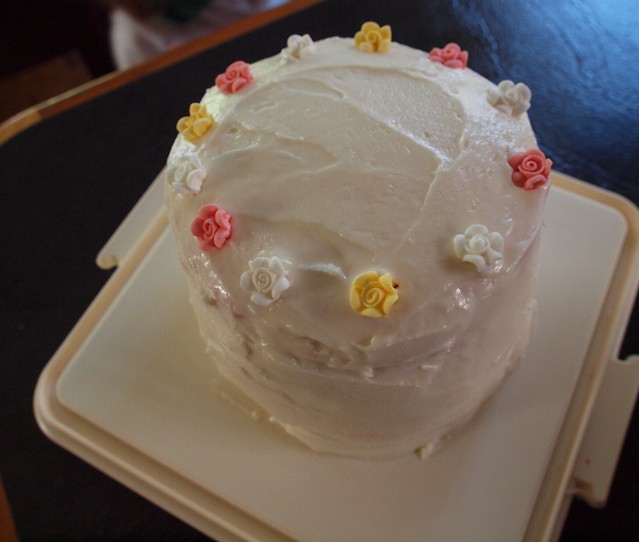
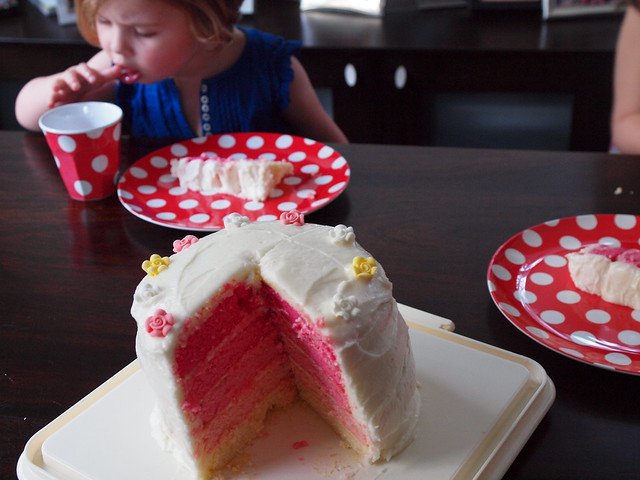
– use a smaller cake tin or a plate to trim your cakes down to the same size. It gives you nice thick edges and makes them more even in size to help with layering and icing. Each finished cake of mine was 16cm in diameter and around 2cm high.

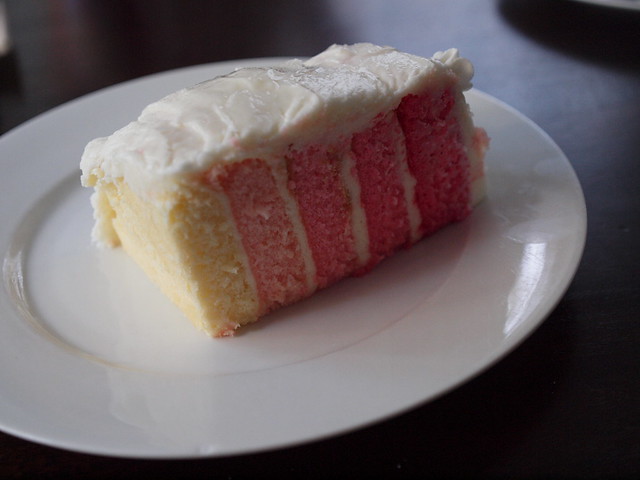
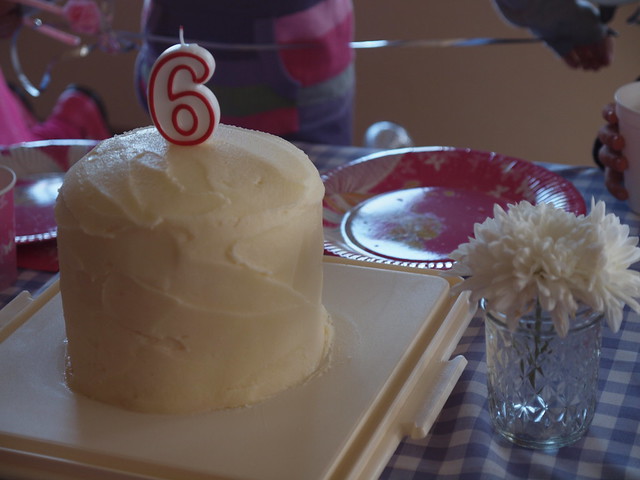
– For my icing I use about 125g soft butter/margerine, 150g light cream cheese, 1kg-1.25kg icing sugar. In your mixer, whisk your butter and cream cheese until thick and creamy. Add in icing sugar gradually as well as a dash or two of milk as needed to get the right consistency. You want a nice thick consistency that stays on the beaters but not too thick that it takes your cake with it when you spread it. You might need to make more icing depending on how thick you are icing and using to sandwich layers.
the cake

– if you are making your icing sugar in the thermomix remember to do it in 200g batches
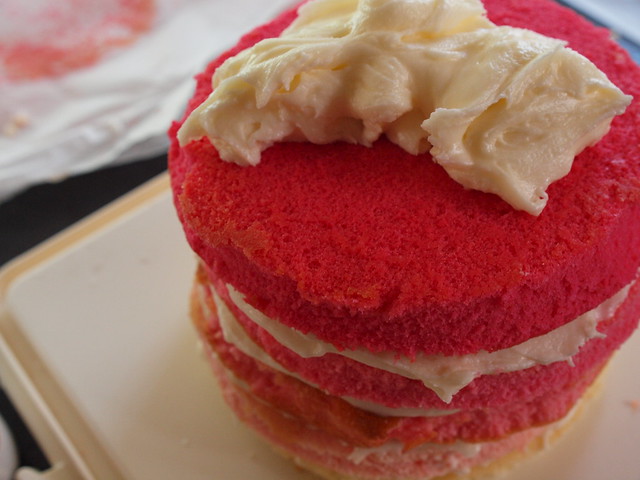
– place your first layer of cake (either lightest or darkest) smack bang in the centre of your cake board with a blob of icing in the centre of the cake and board to keep the bottom layer on the board.
– I don’t use anything like straws to keep my cake together and centred. I aim to spread icing at the same thickness and out to the sides to keep each level straight so that as the next layer is added it is centred on the layer before and I don’t have any toppling
– do a first ‘dirty’ layer of icing where crumbs can be seen and you aren’t too precious about it. Make sure every inch of cake is covered. Pop the cake in the fridge with this layer on and leave for at least 30 minutes until it feels hard. Now you can put your final layer of icing on and you won’t have any crumbs showing through – I learnt this thanks to my readers comments after the first cake I did.
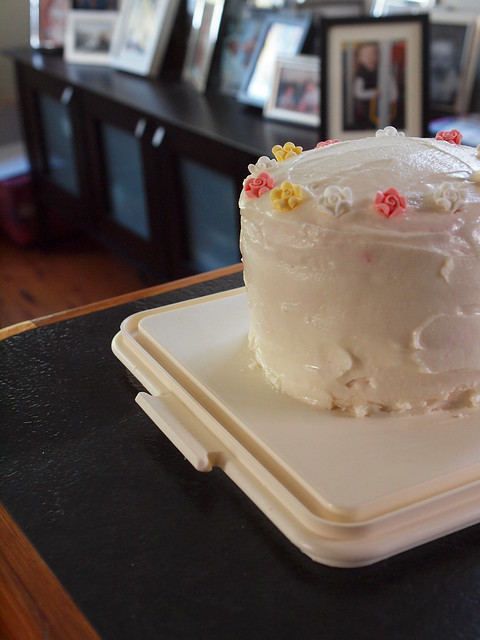
– keep a glass of warm water and a knife handy to smooth over your icing as you go.
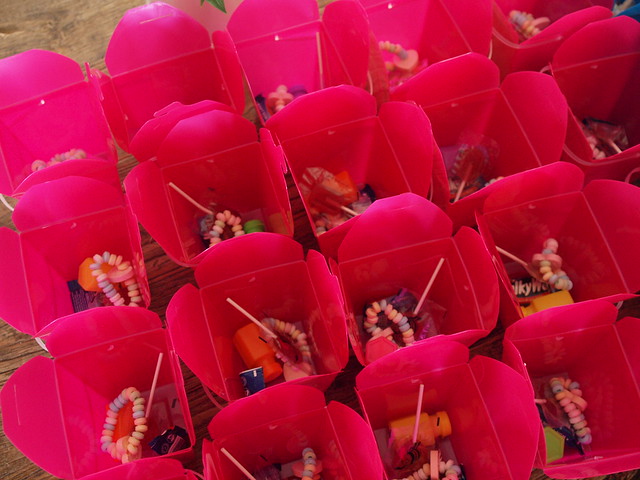
– Keep your cake in the fridge before you need it as it is easier to slice and get a neater finish on each slice. For a party I then divide each slice in half for the little ones to eat….if they have room!
pink rainbow cake
I hope that covers it! This is such a special cake to make and it’s really not that hard! If you still have questions just ask.

elodie’s pink rainbow cake

Let’s blame this picture on pinterest. I knew that was the cake I had to make for Elodie’s birthday. I couldn’t get it out of my head and I was confident enough to wing it…………perhaps there is a better or more professional way of doing it but it all looked pretty straight forward to me.  And mine isn’t perfect but for a home birthday cake…….well I’m pretty proud of myself.

I can't get enough of it

2 quantities of butter/vanilla sponge cake mixture (packet or from scratch – I went packet)
pink food colouring (I just used a 90 cent bottle from the supermarket)
lots of white frosting – I used my cream cheese frosting recipe below
round cake tin/s (I baked in about 18cm cake tins and trimmed down to 16cm round)
the cakes
it doesn’t look pretty but it all comes together
so first of all make up the double batch of butter cake mix. I did mine in my kitchenaid. Divide the batter equally between 5 bowls. I kept one bowl plain which I used for my lower layer. Then I used a drop of pink in the next bowl, mixed it and had a pale pink. You add a dash more colouring to the next bowl and repeat for the other 2 bowls. Lay them out on in a line so you can see the shades of pink. I found I really had to add a few drops to the last bowl to get a hot pink. Now you are going to bake each coloured batter separately. I bought 2 small round cake tins from the supermarket and baked 2 cakes at a time. They don’t need long in the oven just until a skewer comes out clean. Lay baking paper on a cooling rack and leave the cakes to cool on the paper – I didn’t with my first cakes as you can tell.
I love this pic!
Now it’s best to make your cakes the day before so you can ice them easier. I also trimmed my cakes using a slightly smaller cake tin and knife but it’s up to you. Now my lovely facebook friends have told me to freeze them a little first then ice. So make up your frosting. I use about 125g soft butter/margerine, 150g light cream cheese, 1kg-1.25kg icing sugar. In your mixer, whisk your butter and cream cheese until thick and creamy. Add in icing sugar gradually as well as a dash or two of milk as needed to get the right consistency. You want a nice thick consistency that stays on the beaters but not too thick that it takes your cake with it when you spread it.
pink rainbow cake

Almost half of the frosting will go in between the cake layers. Get your cake board or large plate ready and lay the plain cake on it in the centre. Place a dollop of frosting over the top and with a wet knife, spread the frosting evenly over the cake. Spread it right to the edges. Now repeat with the rest of your layers going from plain to the darkest pink.

Now ice the top of the cake and the sides with a layer of frosting. Using a wet knife spread the icing over all of the sides. Crumbs will get everywhere but you’re going to put another layer of frosting over the top. Refrigerate it first then cover the entire cake in frosting, using a wet knife to smooth the frosting. Decorate the top and you’re done. Sit tight and get excited for the moment you cut into it…..these little people were getting very excited.
waiting for the cake
A couple of general tips from me to you……..

– give yourself plenty of time to make and ice the cakes
– try to make your cakes the day before
– make lots of frosting. My recipe above will be the right amount for the entire cake
– because I know you’ll ask: each cake measured 16cm across and 2-2.5cm high.
– lay baking paper over your cooling racks as I got serious indentations from the rack onto my cakes
– trim your cakes if necessary, I did this with a slightly smaller cake tin
– keep the cat out of the kitchen because it will want to lick the icing
– forget about how much frosting you are putting on the cake and then eating
– the best diets always start tomorrow/on monday/next week/in the new year

from the top
a look inside

and that was my first ever rainbow cake…………….and I loved it. I will definitely make one again and it’s so worth the time and effort.
the very first slice is out

so pretty
off to the neighbours
pretty layers

two days till the birthday party

Keira turns 7 this weekend. We’ve known about this for some time since she has been giving us the daily countdown each morning for the last few months. I think I’m still in denial but I can see this girl is growing up on me. And fast. I’m sure I didn’t start slamming doors till I was at least 10 years of age. But she’s a good girl and even said to me, ‘mummy I don’t mind if you don’t get me a present this year. I really don’t’.

Birthdays mean parties and parties mean work. And I am here to tell you that I have a lot of work to do before her party this Saturday. 24 little people will be gathering together with Keira to celebrate AND thankfully not at our house.

I do love the home party and we had a great one last year (you can read about it here) but this year we’ve gone with an art party at her art school. And as I sit at my house which needs a really good clean and I have a lot of blog work due, I’m so grateful that I’ve outsourced the party this year. All I have to do is food and the cake. And we’ve picked the apple cake from the Women’s Weekly Bumper Book of Kid’s Birthday Cakes. Great book by the way with all of the classics and some new ones.

But I will stress about the party and make way too much food and hope the cake turns out right. Because for some reason I can bake a cake on any given day of the year but ask me to bake a cake for a birthday party and I am bound to make a mistake or have a disaster. For Keira’s 5th birthday I just could not get the dolly varden cake to bake in our old oven. 3 times. Yep I tried 3 times before I resorted to cupcakes.  Last year I did the pink rainbow cake and it was a huge success and I’ve put a few hints here.

so proud of this cake

So please excuse me from blogging while I get down to business. I need to plan the menu, shop the big shopping list, bake and decorate the cake and get those lolly bags underway.

topped off with a couple of party mix lollies

 Best birthday tip? Biggest birthday cake disaster?

party preparations

Well we are in the thick of party preparations here as tomorrow our gorgeous keira turns 6 and I have quite the party planned for her. It sounded like such a good idea to have a home party for her but as it draws closer and I have so many jobs to do I’m having second doubts!
lolly boxes
Retro daddy reigned in a few things. Like when I wanted 16 fold up chairs from ikea and he was not ok with that. He wanted me to use all the dining chairs and benches we had in the house and couldn’t understand why I wanted everything white to go with the pink theme of the party. We compromised on 8 fold up chairs and our 8 white dining chairs and had to agree to disagree. And then this week I realised we’d have a total of 23 kids so turns out I’ll be using all the odd chairs I can find in the house!

topped off with a couple of party mix lollies
Retro daddy will be on games, we have a face painting lady as a special treat for keira and we have a craft table with beads where everyone can make some jewellery. 
craft read for the party
I still can’t believe Keira is turning 6. Sometimes I think she is much older (and tend to give her a lot of responsibility in the house) and sometimes she reminds me that she is still a little girl. She’s an amazing reader and is reading James and the Giant Peach at the moment with the tiniest writing for a little girl. She still hates maths and doing homework but is glad we stopped kumon. Anytime she doesn’t want to do her homework I tell her that we can go back to kumon if she likes – that always gets her back on track.
thinking
aged 2
keira
almost 6!

She has a pretty full life with ballet, swimming and spanish after school (which she loves), her new teacher lets them dance to a current song just before the bell goes if they’ve been good and lie on the floor to read books so she is loving that. She’s settled into her new school pretty quickly and is an all round good girl. Let’s hope we can keep it up.
So in the meantime I’m going to get back to the kitchen because I have coconut ice, rocky road and a pink rainbow cake to make as well as make the house sparkle! But my little friend is giving me attitude today so this should be fun……….
elodie gives attitude
I’ll report back tomorrow with a full debrief for you all……………..from the couch which is where you’ll find me at 3.01pm!

how to create the ultimate My Little Pony Party + giveaway

brought to you by My Little Pony

Pinterest has a lot to answer for. All of those amazing parties and there is just so much inspiration. And it can be easy to look at the parties and think that you’d need to be an expert cake decorator, party planner, stylist, chef and have no children in the background to pull them off. All of those craft ideas, the games, the candy buffet, the cake, the cookies. I could go on.

In our house we love a home party. I recently set myself the challenge of creating the ultimate My Little Pony party at home. I would do the cake, the games, the food (ok the sausage rolls I did not make) and decorate the room. And I must have done a good job because the kids almost had a heart attack when they came down the stairs the next morning to see what I’d done. Apparently and this is what they said….better than pinterest. Yep. that’s what they think.

I’m going to talk you through everything I’ve created so that you can create an amazing My Little Pony party at your house…………..and just so you know I did this in the school holidays, 6 little people under 9, no babysitter…just me. Kids were put to work but we got there and I’m pretty proud.

So let’s start …………

pick your colour theme

Before you even put pen to paper or hit the party store or supermarket you need to pick your colour theme. We love Rainbow Dash and decided that a rainbow colour theme was what we wanted. You could also choose your favourite My Little Pony character and use that colour scheme. We also loved polka dots so incorporated that in to our theme. You could go pink, purple or pick two colours that you love.

plan the menu

Kids love sausage rolls, fairy bread, jelly, fruit and lemonade. You can go as fancy as you want with the food but I’m just telling you what always gets eaten at our parties.

The rainbow jelly cups were lots of fun. You’ll need 4 or 5 different coloured jelly sachets and work out the order you want in the cup. Grab some plastic cups (don’t go too big), do a layer  of jelly at a time leaving them in the fridge to almost set before the next coloured jelly goes on. It’s best to do this the day before when you’ve got a bit of time. It’s really important that the jelly layer underneath is almost set before you put the next one on top. Lots of fun and very popular. All gone now. The My Little Pony cutlery was less than $5 at the party store and keeps it all in theme.

For fairy bread with a difference take a slice of bread, spread some spreadable cream cheese out to the sides, cut the crusts off, sprinkle on 100’s and 1000’s then roll up the bread and cut into 4 pieces like sushi. Fun and easy for little fingers to eat.

Rainbow fruit salad cups are so easy. We took some cupcake wrappers and filled them with banana, kiwi, grapes and strawberries. The little toothpicks come from the party store and line them up on your table in neat rows or put them on a serving platter. So quick and easy and something healthy too.

rocky road is also fun, I used my freckle sundae rocky road recipe which you’ll find here. This is a great one to serve to the adults at your party as well.

the cake

Making the cake can sometimes stress me out. I can bake a cake at any other time of year but somehow the pressure of the birthday cake can make me nervous.

Because I wanted to show off the tiny Neon Bright My Little Pony toys (and because I’m not that fantastic with very fancy large cakes) I made cupcakes using this recipe and a simple cream cheese frosting. Hundreds and thousands and rainbow sprinkles were sprinkled on top and a cute My Little Pony on top. You can also find my simple party cakes recipe here which has less ingredients and is super quick and easy to make too.

The cupcake stand came from the supermarket a few years ago and comes out everytime we have a party. They are inexpensive and a great little investment for your parties and entertaining at home. Cupcakes really do take the pressure off and take less 20 minutes in the oven to bake. And note to self, don’t put the cakes out on the table too early or the littlest members of the family will take to rearranging the ponies themselves.

decorate your table

You’ve probably seen that having a party table with the food all laid out, jars full of lollies (aka the candy buffet) are all the rage in parties at the moment. And they are so much fun and don’t need to be over the top or an expensive exercise. I raided my glassware which has been picked up from my mother in law and garage sales and a few nice jars that were to be used for jams. Fill them with some lollies and voila you’ve added something very special to your table and instantly made it look like you’re a party planner in your spare time. No really. We decorated with some Rainbow Dash My Little Pony toys. I also found a straw dispenser in my craft room which was a fun way to display the polka dot straws.

Isn’t this the cutest idea that I found on pinterest. Take a jar and fill with sprinkles and pop a tiny My Little Pony toy on top. So cute and fun.

The labels were a couple of dollars for a pack and I’ve packed them away for another party. They came with sticks and little stands so you can use them in a variety of ways. Buy some of the lollies in bulk at your nearest party store to save money or if you have a big case to fill. This was my Mother in law’s vase and I just love it for parties and decorating a table.

I know that people like to have a blank wall behind the table but I just love the window and line up your my little pony collection along the windowsill. This was so much fun and you can make your own with ribbon and some crepe paper. There are so many inexpensive ways to decorate walls and windows.

I love our dining table and it’s also just that bit too big for tablecloths so for $5 I picked up a My Little Pony pack of confetti to decorate the table. So much fun and you’ll be picking it up off the floor and finding it in odd places for months to come. You could also grab a hole punch and cut out bits of brightly coloured paper to decorate your table.

We also had this gorgeous My Little Pony carriage to decorate our table. This was so much fun to play with as well.

craft, games and activities

Now you’ll need a few tricks up your sleeve to keep everyone entertained. One of the things I love to do is have a craft activity for when our little guests arrive. You don’t want to start doing anything before eveyrone arrives so some rainbow crayons and big A3 sheets of copy paper will have everyone drawing. This is my little miss when I asked her to draw a pony (well technically I had to say horse because that’s what she calls ponies).

Ask your guests to bring their My Little Pony toys with them and have some fun letting the ponies get to know each other.

And why not have a My Little Pony salon where the ponies can get their hair brushed, pop a clip in and you could paint the little ones fingernails with some fun rainbow coloured nail polishes or glitter too. Inexpensive and lots of fun.

We also picked up a sheet of 16 My Little Pony tattoos for less than $5 and cut them up. They are lots of fun of hands and can finish off the whole Pony Salon experience. Pop a helper or grab a mum to help out at the Pony salon. My sister is always great at being put to work at our parties.

Another fun activity is to make up a batch of cupcakes, set aside the icing and some sprinkles and other toppings and let the party guests ice and decorate their own cupcakes. My girls love doing putting the frosting on and it’s a fun activity for everyone.

And you can’t beat pass the parcel at a party. We just love it. Why not put a special My Little Pony toy in there as the main prize. This one comes with stickers and can be decorated. I’ve kept it in the box but all my girls are dying for me to open it up.

And to get the kids outside and for a bit of fun you can’t beat a pinata! You can use a donkey one, a number for the birthday or we were lucky to take the last rainbow pinata at the store. Fill with wrapped sweets and some My Little Pony toys would be cute too. My kids love a pinata.

the goody bags

Have I told you about when my kids went to their grandma’s 90th birthday party. All of them asked where the lolly bags were. Yep, you can’t go to a party and leave without your lolly bag. We found this fun bags for a couple of dollars. Pop in a fun straw, plastic necklace, some rainbow jelly beans or wrapped lollies, a little tattoo, a Neon Bright My Little Pony, some of the confetti and we also had rainbow bubble packs (not in the photo) to complete our bags. Some people like to keep lollies out of the lolly bag but you’ve got lots of fun ideas to make a goody bag for your guests.

 My last words of advice for hosting a fabulous kids party at home

make lists

use the time before the party to set the table and have all of your plates out

do a time plan for the day and include when you’ll do food, games, cake etc

get the kids helping with the party preparations

don’t serve too much food and try to limit the hot food so you aren’t in the kitchen the whole time

don’t go to the party store or supermarket without a list

look online

raid your house, toy tubs, linen cupboards and craft supplies to see what you have

create a pinterest board for parties and save all of your favourite ideas in the one place

I hope you enjoy these ideas and are all inspired to host your own ultimate My Little Pony party. I’ve created a pinterest board here with lots more ideas for My Little Pony parties. I’m actually now going to host Elodie’s 5th birthday party later in the year as a My Little Pony one that I’ve got everything here and we haven’t taken the table down because the kids love it so much and are still playing with the toys.

And to share the love I’ve got a fun giveaway and wait to see you the prize list!!!! To win some  wonderful packs of My Little Pony for your little ones just answer this simple question

 Which My Little Pony Character would you use to theme your pony party, and why?

PRIZE DETAILS:
1 Major Prize

1 X Ultimate Rarity RRP $29.99
1 X MLP Carriage RRP $24.99
15 X MLP Blind Bag RRP $4.99
10 X Cutie mark pony friends RRP $6.99
4 X Deluxe Winged Pony RRP $12.99
 
3 Runners Up, each will get:
1 X Ultimate Rarity RRP $29.99
1 X Deluxe Winged Pony RRP $12.99
6 X MLP Blind Bag RRP $4.99

Giveaway is open to Australian residents, entries close 28 April 2015, one entry per person, full terms of my giveaways can be found here.